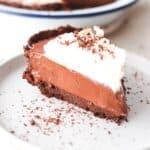
Chocolate French Silk Pie
This chocolate French silk pie made with an Oreo crust Is a rich and decadent chocolate flavor filling that has a smooth and silky texture inside a chocolate crunchy pie crust. This no-bake pie tastes so luxurious and is well worth the effort for an indulgent dessert.
Servings: 10 Servings
Calories: 732kcal
Equipment
- 9 inch pie dish
Ingredients
For the pie crust
- 24 Oreo cookies (use the whole Oreo and don't remove the filling) I used gluten free Oreo's
- 80 grams Butter
For the filling
- 300 Heavy cream also known as double cream
- 200 grams Dark chocolate (I used 70%) Always check that the chocolate is gluten free as some brands may contain gluten.
- 200 grams Sugar I used granulated sugar
- ¼ teaspoon Salt
- 3 large Eggs
- 100 grams Unsalted butter (room temperature) cubed
- 1 teaspoon Vanilla extract
For the topping
- 200 grams Heavy cream
- ¼ teaspoon Vanilla extract
- 25 grams Powdered sugar
- Chocolate shavings or curls to decorate
Instructions
How to make the pie crust
- Place the Oreo cookies in a food processor. Blend until they resemble fine crumbs.
- Melt the butter in short bursts in the microwave. Add the melted butter to the Oreo crumbs and mix it well until it is fully combined with the Oreo crumbs.
- Place half of the Oreo mix into the pie dish, and using your hands, firmly pack the crumbs around the sides of the pie dish. Add the remaining Oreo crumbs into the pie dish and pack firmly on the bottom of the dish. I used a glass to help pack it firmly.
- Place the pie crust in the refrigerator for at least 1 hour to set.
How to make the filling
- Whip the cream with an electric whisk or a stand mixer until it forms stiff peaks, and then cover and place in the fridge. This will take around 3-4 minutes.
- Cut the chocolate into small pieces and set aside.
- Place the eggs and sugar into a bowl over a double boiler/bain-marie (a pot with simmering water that does not touch the bottom of the bowl). Whisk constantly until the mixture reaches 160℉/71℃ when using a candy thermometer. This will take approximately 5-10 minutes.
- Carefully remove the bowl from the heat and stir in the chocolate, salt, and vanilla until the chocolate has fully combined and melted.
- Let the mixture cool, and then stir in the butter a few cubes at a time until fully combined.
- Remove the whipped cream from the fridge and fold in half of the whipped cream until it is fully incorporated, and then add in the remaining half and continue to fold in the cream until it has fully combined with the chocolate mixture.
- Transfer the chocolate filling into the Oreo pie crust and spread it out evenly within the dish using an offset spatula. Let it come to room temperature then cover and place in the fridge to set for at least 4 hours or overnight.
How to make the topping
- Make the topping once the filling has set.
- Pour the cold cream into a large bowl and add the powdered sugar and vanilla extract.
- Using an electric whisk, whisk until soft peaks form.
- Spread the whipped cream on top of the set filling. You can also pipe the cream on if you want a fancier finish. I scooped the cream using a spoon and then used an offset spatula to gently spread it over the top of the pie.
- Sprinkle the top of the cream with shaved chocolate or chocolate curls to decorate.
Notes
Recipe Tips
- Tip #1: Packing the sides of the pie dish with the Oreo crumbs first will make it easier to get an even pie crust.
- Tip #2: If you don't have a thermometer when making the filling, you can test that it is done, as it will look fluffy and pale. When you rub the mixture between your finger and thumb, it will be very hot, and you will not be able to feel any sugar granules as it has all dissolved (This does not guarantee that the eggs are cooked, so this is dependent on your own judgement).
- Tip #3: The filling will look thicker but still runny when transferring it to the pie dish, but the mixture will thicken more and firm up as it sets in the fridge.
- Tip #4: Watch the cream closely as you whip it. Over-whipping can cause the cream to turn into butter, although under-whipping will result in a runny cream. You want the cream to form beautiful, soft peaks when you lift the beaters. If you overbeat, mix in a little extra cream to help improve the texture.
Nutrition
Serving: 1Serving | Calories: 732kcal | Carbohydrates: 55g | Protein: 12.3g | Fat: 51.7g | Saturated Fat: 29.1g | Polyunsaturated Fat: 3.5g | Monounsaturated Fat: 11.6g | Trans Fat: 0.5g | Cholesterol: 347.9mg | Sodium: 405.2mg | Potassium: 308.7mg | Fiber: 2.3g | Sugar: 45.2g