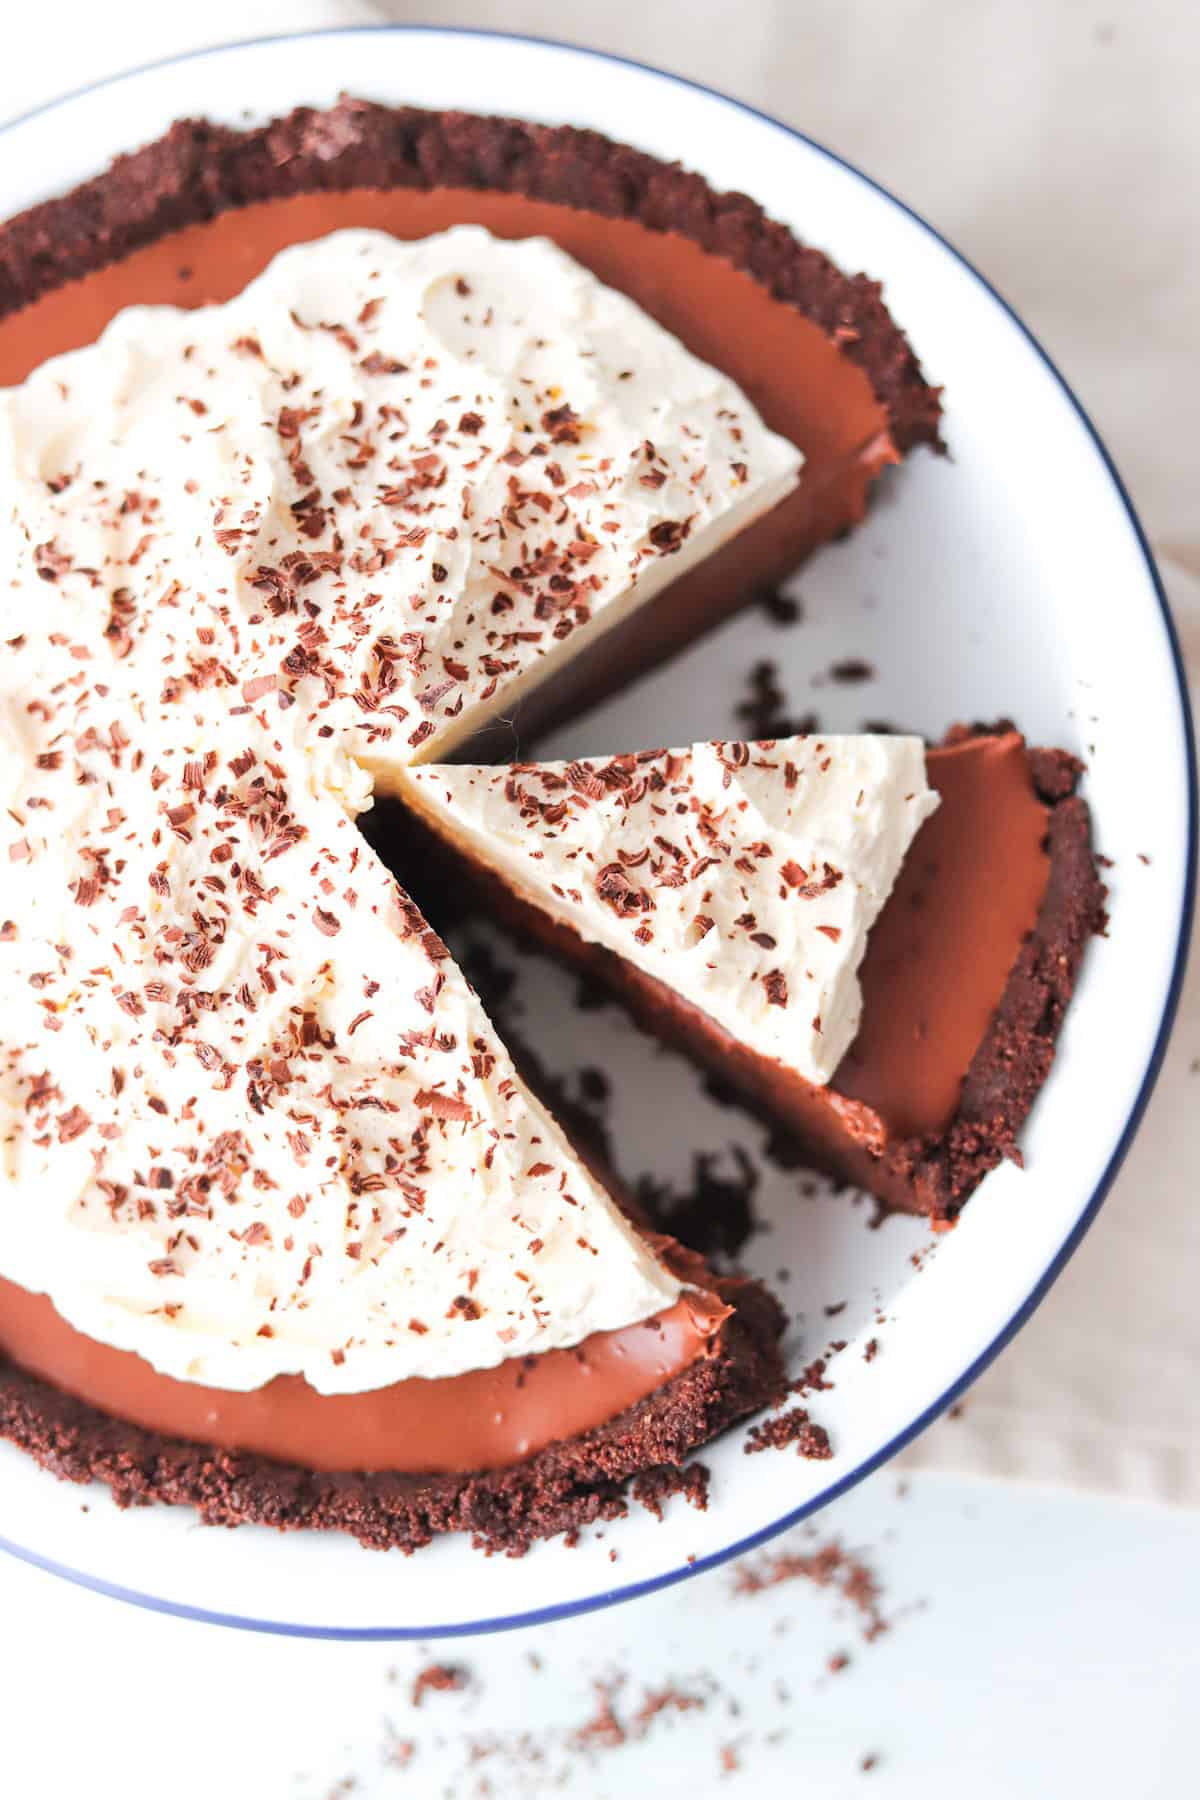
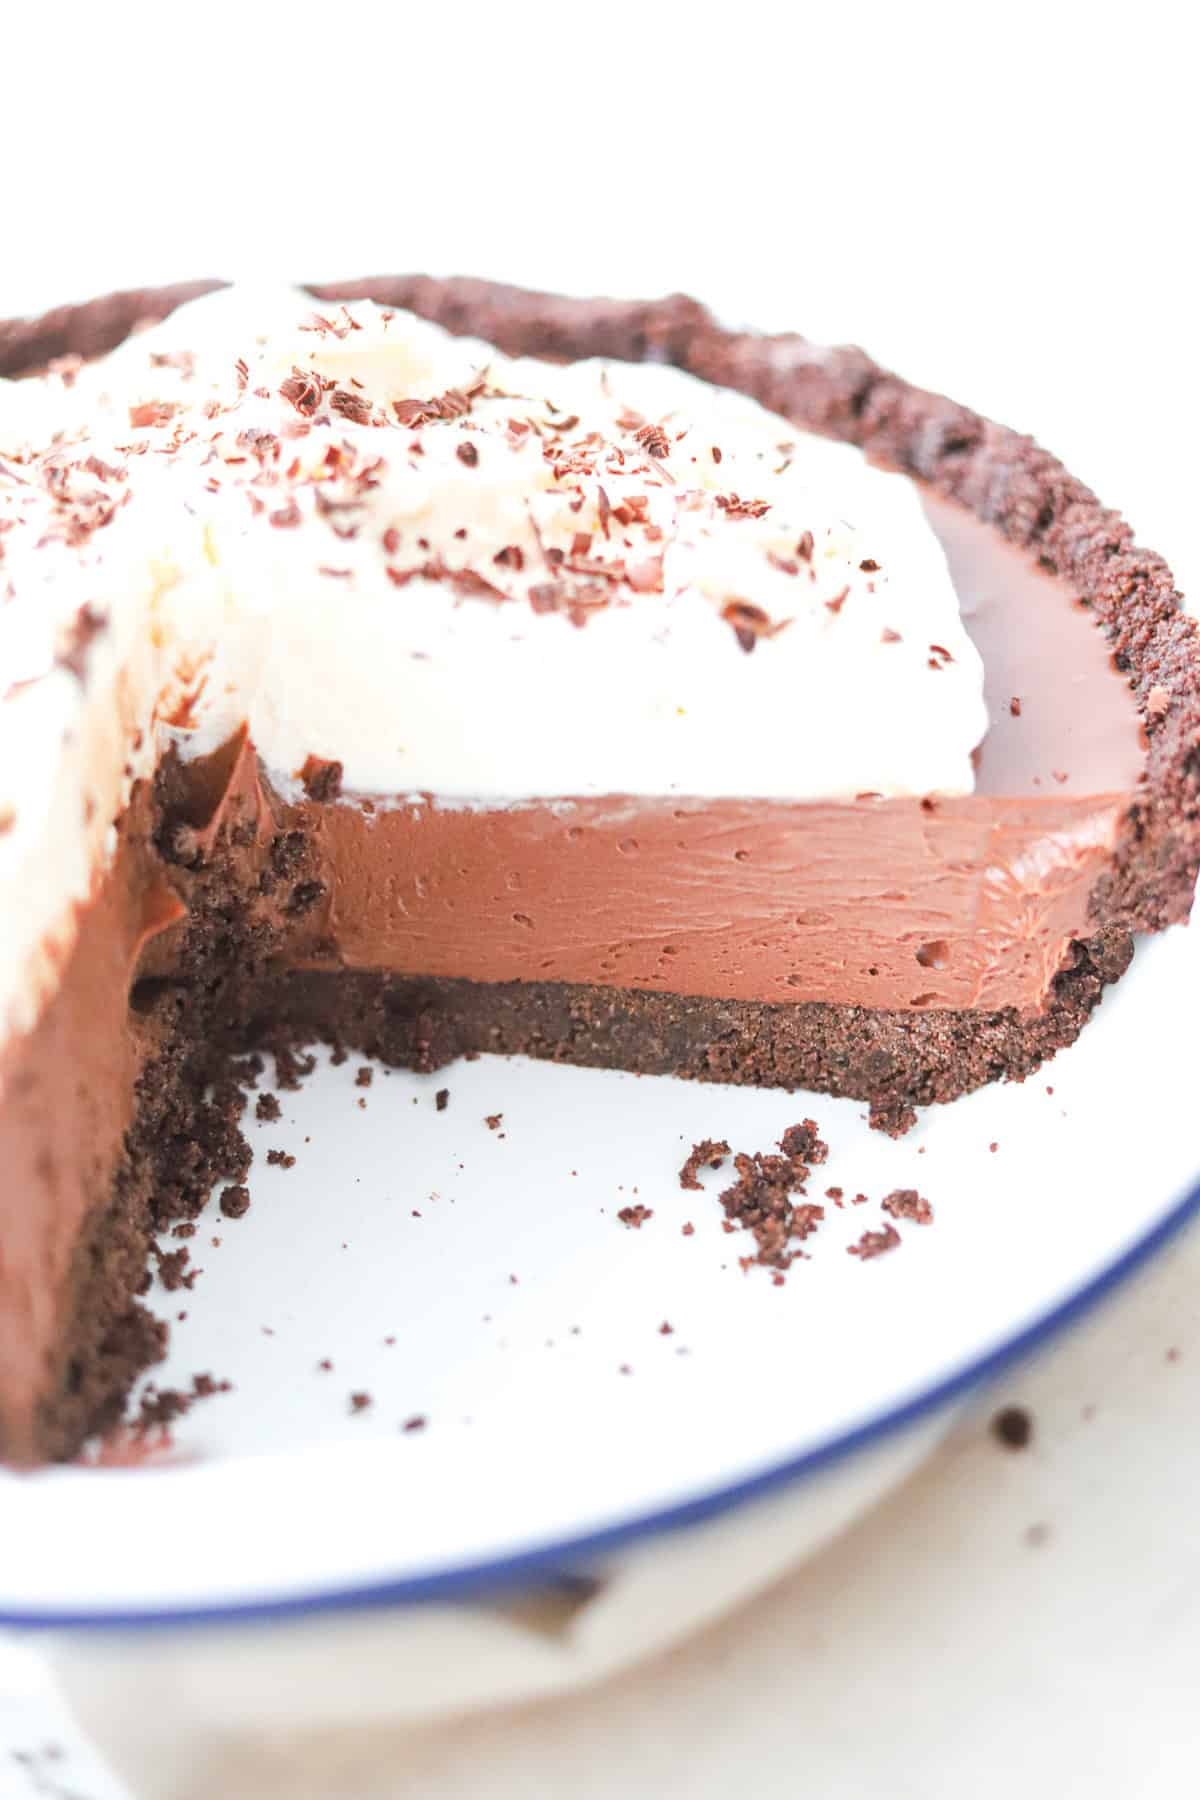
This chocolate French silk pie made with an Oreo crust has a rich and decadent chocolate flavor filling that has a smooth and silky texture inside a Oreo crunchy pie crust.
This no-bake pie tastes so luxurious and is well worth the effort for an indulgent dessert.
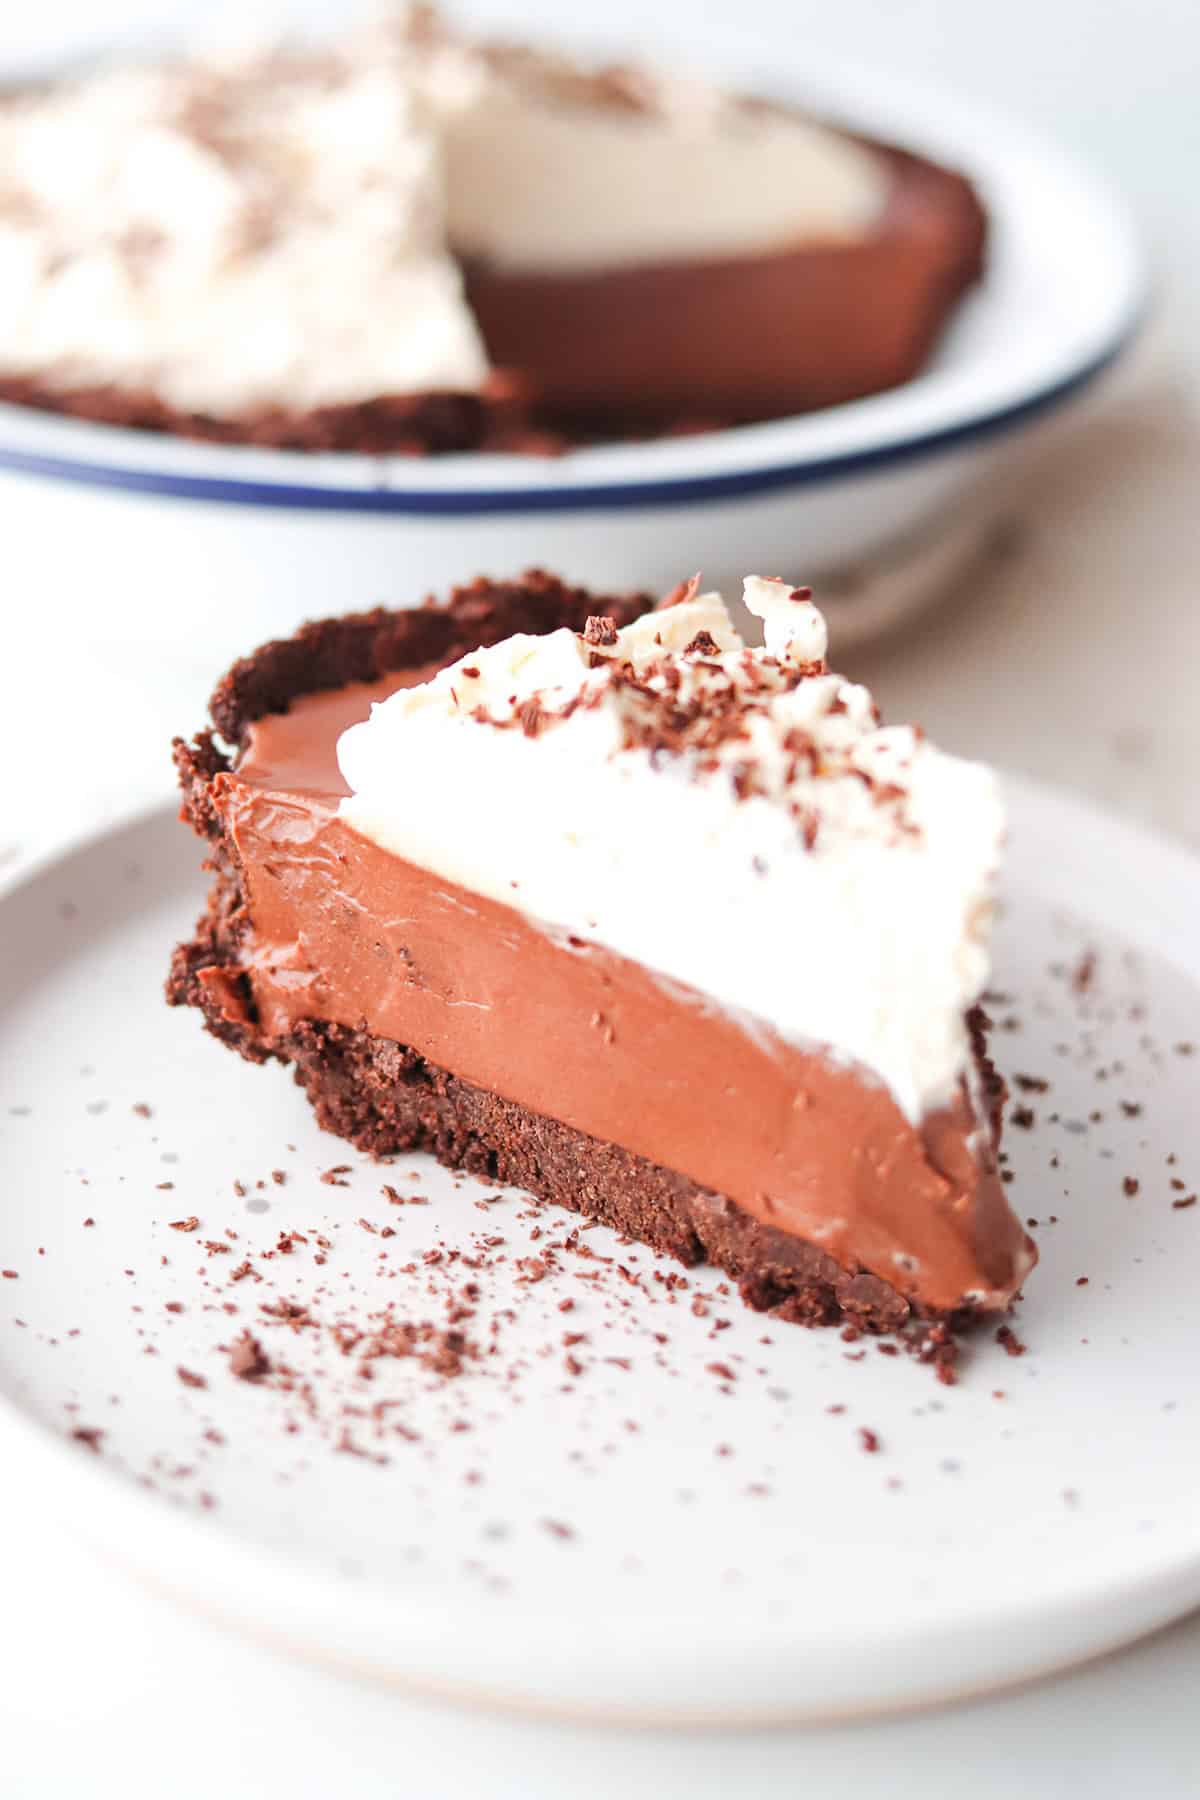
This indulgent pie is the perfect no-bake dessert that is ideal for special occasions such as Thanksgiving, Christmas, or as a lovely treat.
Other decadent chocolate desserts or treats that are great for special occasions are my chocolate strawberry tarts, gluten free brownie pie, thick chocolate milkshake, gluten free chocolate fudge cake, and chocolate crumb cake.
Jump to:
📸 Recipe Snapshot
⏱ Prep & Cook Time: Requires around 50 minutes of hands-on time.
👩🍳 Skill Level: This pie is more of an intermediate level as it requires a few steps, but is easy when you break down each of the steps.
🥄 Servings: 10 servings.
🍫 Flavors & Textures: Rich and decadent chocolate flavor filling that has a smooth and silky texture inside a chocolate crunchy pie crust.
📖 Dietary Notes: Easily made gluten free using gluten free Oreo cookies.
❄️ Make Ahead: Can be made a couple of days ahead of serving.
Recipe Development
When making this chocolate French silk pie, I wanted to keep it as a no-bake pie with very little cook time. I have previously used my gluten free pie crust that has been fully blind baked, but decided to use the gluten free Oreo pie crust for that no-bake element.
French silk pie was originally developed in the United States in 1951 and was traditionally made by whipping raw eggs. This is something that I am not comfortable serving. I used the method of cooking the eggs over a double boiler until they reached 160°F (71°C) , making it safe to eat.
I then topped the chocolate French silk pie with Chantilly cream and chocolate shavings. If you want to have a fancier finish, you can pipe the cream on and then top with chocolate curls. See my gluten free dark chocolate cake for how to make chocolate curls.
📋 Ingredients Notes
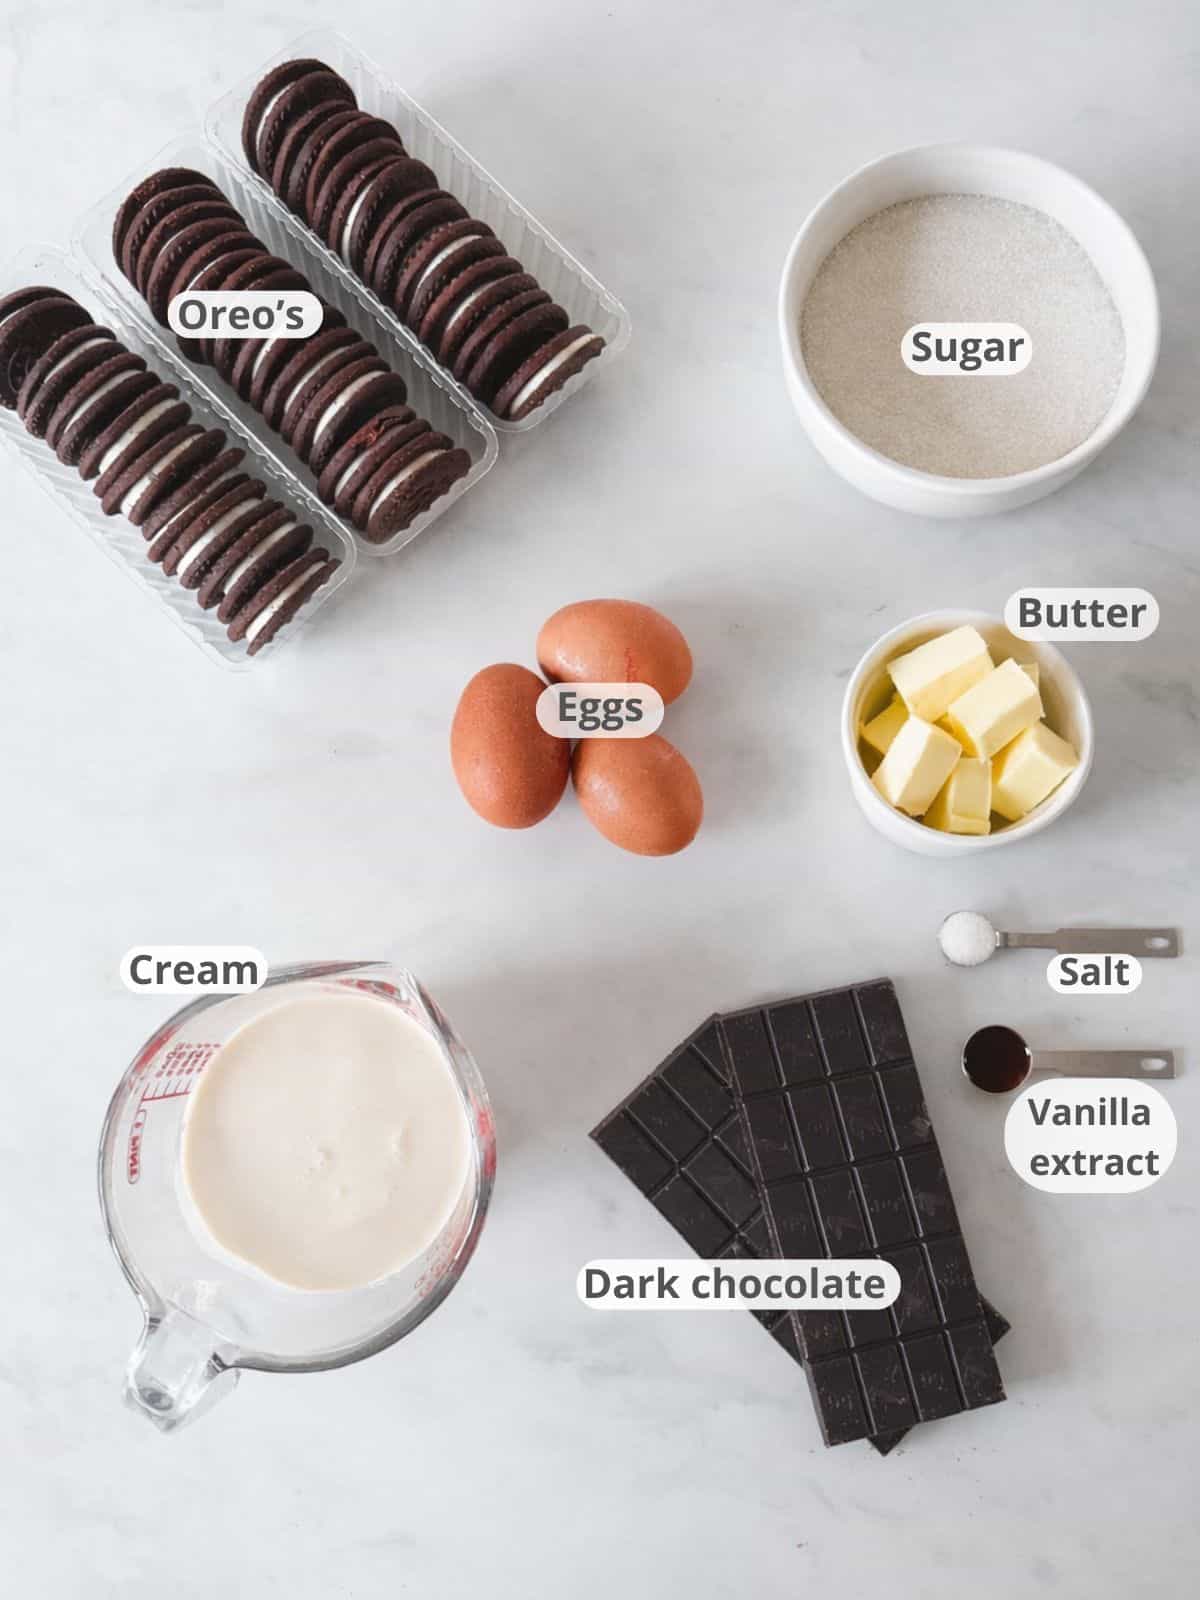
- Oreo cookies - Use the whole cookie and its filling when making the pie crust. I used gluten free Oreo's.
- Cream - Heavy cream also known as double cream.
- Dark chocolate - I used 70%. Always check that the chocolate is gluten free as some brands may contain gluten.
- Sugar - I used granulated sugar in the chocolate filling and powdered sugar in the fresh whipped cream topping.
- Salt - enhances the flavor and balances out the sweetness.
- Eggs - I used large eggs.
- Unsalted butter - room temperature, cubed butter.
- Vanilla extract - adds additional flavor.
See the recipe card below for ingredient measurements.
⚡ Substitutions & Variations
- Pie Crust - If you prefer you could use a store-bought pie crust or make a homemade gluten free pie crust.
- Dairy Free - I haven't tested this recipe with dairy free ingredients. If you want to try using dairy free chocolate, cream, and butter, I would love it if you come back and let me know how it turned out.
🥣 Step by Step Instructions
Below is a brief step-by-step process with photos of how to make a chocolate french silk pie.
See the recipe card below for more detailed recipe instructions.
Make the Oreo crust

Step 1: Place the Oreo cookies in a food processor. Blend until they resemble fine crumbs.
Step 2: Melt the butter in short bursts in the microwave. Add the melted butter to the Oreo crumbs and mix it well until it is fully combined with the Oreo crumbs.
Step 3:Place half of the Oreo mix into the pie dish, and using your hands, firmly pack the crumbs around the sides of the pie dish.
Step 4: Add the remaining Oreo crumbs into the pie dish and pack firmly on the bottom of the dish. I used a glass to help pack it firmly.
Place the pie crust in the refrigerator for at least 1 hour to set.
Tip: Packing the sides of the dish first will make it easier to get an even pie crust.
Make the filling

Step 5: Whip the cream with an electric whisk or a stand mixer until it forms stiff peaks, and then cover and place in the fridge. This will take around 3-4 minutes.
Cut the chocolate into small pieces and set aside.
Step 6: Place the eggs and sugar into a bowl over a double boiler/bain-marie (a pot with simmering water that does not touch the bottom of the bowl). Whisk constantly until the mixture reaches 160℉/71℃ when using a candy thermometer. This will take approximately 5-10 minutes.
Step 7: Carefully remove the bowl from the heat and stir in the chocolate, salt, and vanilla until the chocolate has fully combined and melted.
Step 8: Once the chocolate is fully combined and lump free. Set the bowl aside to cool slightly.
Tip: If you don't have a thermometer when making the filling, you can test that it is done, as it will look fluffy and pale. When you rub the mixture between your finger and thumb, it will be very hot, and you will not be able to feel any sugar granules as it has all dissolved (This does not guarantee that the eggs are cooked, so this is dependent on your own judgement).
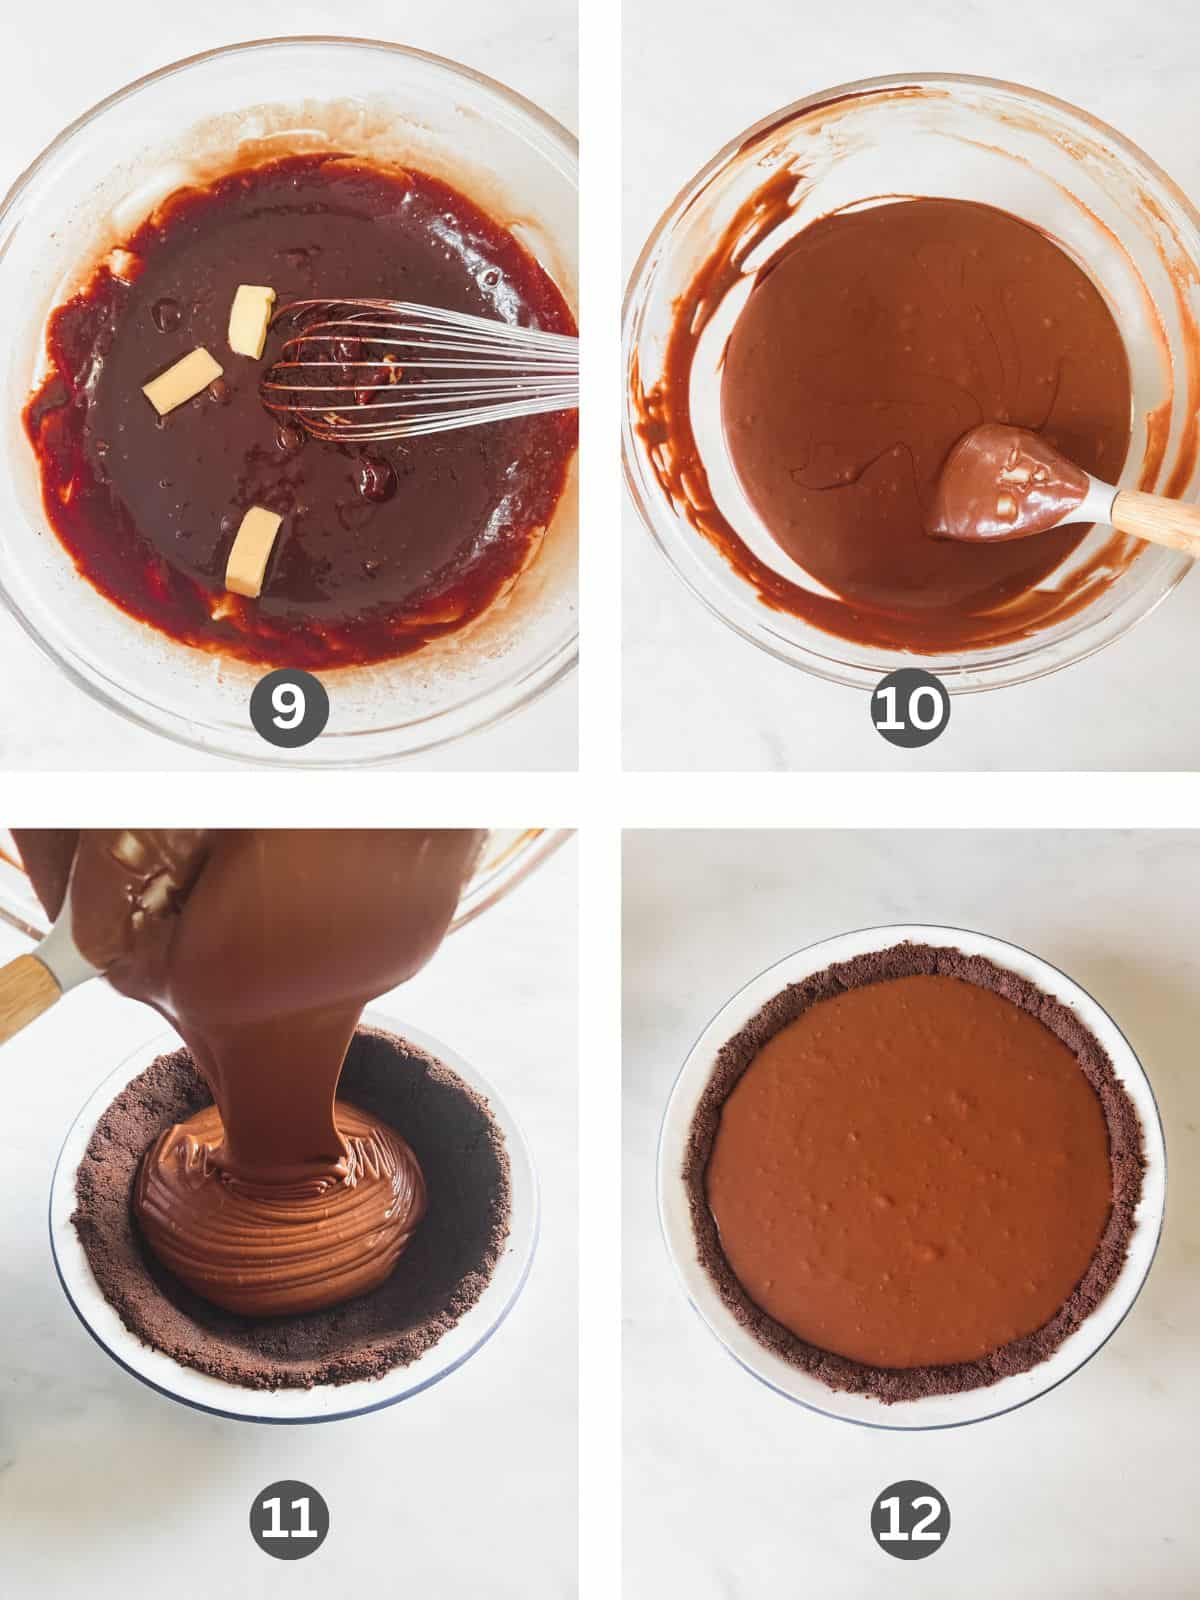
Step 9: Let the mixture cool, and then stir in the butter a few cubes at a time until fully combined.
Step 10: Remove the whipped cream from the fridge and fold in half of the whipped cream until it is fully incorporated, and then add in the remaining half and continue to fold in the cream until it has fully combined with the chocolate mixture.
Step 11: Transfer the chocolate filling into the Oreo pie crust and spread it out evenly within the dish using an offset spatula.
Step 12: Let it come to room temperature, then cover and place in the fridge to set for at least 4 hours or overnight.
Tip: The filling will look thicker but still runny when transferring it to the pie dish but the mixture will thicken more and firm up as it sets in the fridge.
Make the topping
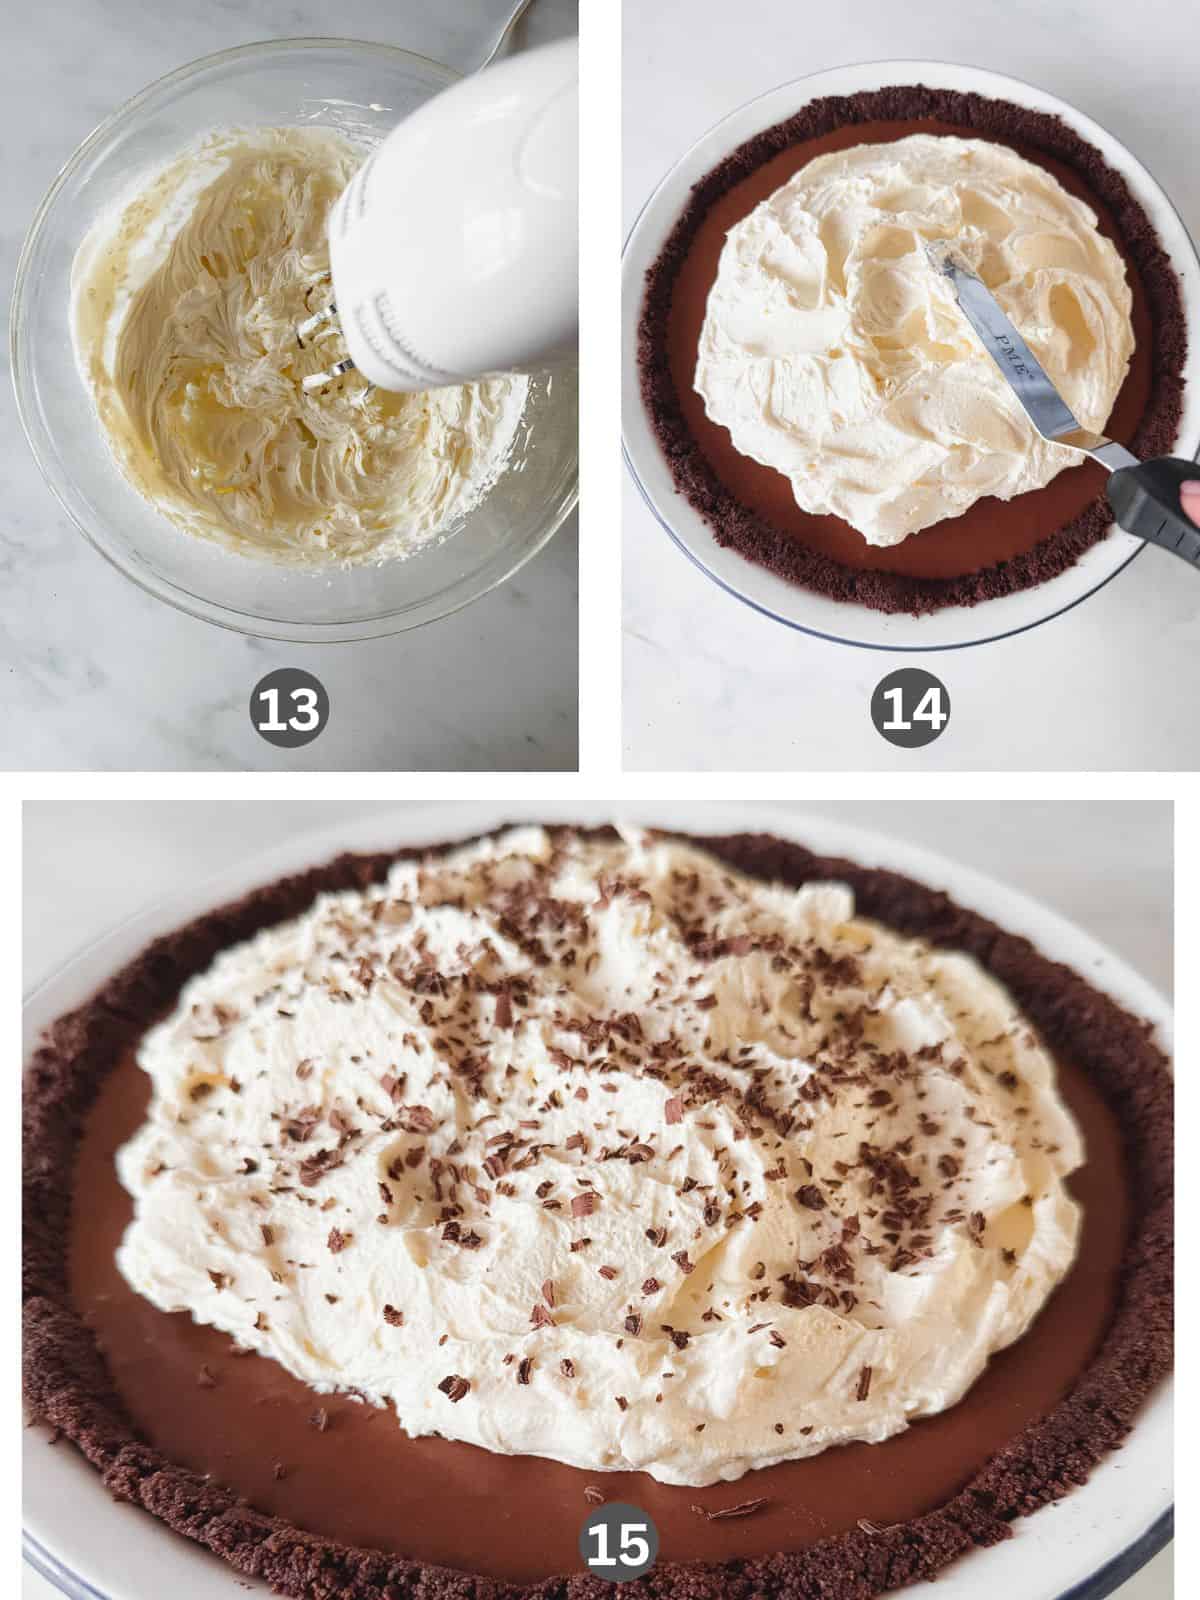
Step 13: Make the topping once the filling has set. Pour the cold cream into a large bowl and add the powdered sugar and vanilla extract. Using an electric whisk, whisk until soft peaks form.
Step 14:Spread the whipped cream on top of the set filling. You can also pipe the cream on if you want a fancier finish. I scooped the cream using a spoon and then used an offset spatula to gently spread it over the top of the pie.
Step 15: Sprinkle the top of the cream with shaved chocolate or chocolate curls to decorate.
Tip: Watch the cream closely as you whip it. Over-whipping can cause the cream to turn into butter, although under-whipping will result in a runny cream. You want the cream to form beautiful, soft peaks when you lift the beaters. If you overbeat, mix in a little extra cream to help improve the texture.
💡 Pro Recipe Tips
- Tip #1: Packing the sides of the pie dish with the Oreo crumbs first will make it easier to get an even pie crust.
- Tip #2: If you don't have a thermometer when making the filling, you can test that it is done, as it will look fluffy and pale. When you rub the mixture between your finger and thumb, it will be very hot, and you will not be able to feel any sugar granules as it has all dissolved (This does not guarantee that the eggs are cooked, so this is dependent on your own judgement).
- Tip #3: The filling will look thicker but still runny when transferring it to the pie dish, but the mixture will thicken more and firm up as it sets in the fridge.
- Tip #4: Watch the cream closely as you whip it. Over-whipping can cause the cream to turn into butter, although under-whipping will result in a runny cream. You want the cream to form beautiful, soft peaks when you lift the beaters. If you overbeat, mix in a little extra cream to help improve the texture.
❔ Recipe FAQs
Store the chocolate silk pie in the fridge for up to 5 days.
Yes, this chocolate french silk pie recipe is best made the day before serving.
Yes, I made it gluten free. I used gluten free Oreo's and checked that my chocolate does not contain any gluten.
More Chocolate Recipes


If you tried this chocolate silk pie recipe. Please leave a star 🌟rating in the recipe card below & a review in the comments section further down the page. Subscribe and get free recipes straight to your inbox.
📖 Recipe

Chocolate French Silk Pie
Nutritional information is meant as a guideline and all information is approximate.
Equipment
- 9 inch pie dish
Ingredients
For the pie crust
- 24 Oreo cookies (use the whole Oreo and don't remove the filling) I used gluten free Oreo's
- 80 grams Butter
For the filling
- 300 Heavy cream also known as double cream
- 200 grams Dark chocolate (I used 70%) Always check that the chocolate is gluten free as some brands may contain gluten.
- 200 grams Sugar I used granulated sugar
- ¼ teaspoon Salt
- 3 large Eggs
- 100 grams Unsalted butter (room temperature) cubed
- 1 teaspoon Vanilla extract
For the topping
- 200 grams Heavy cream
- ¼ teaspoon Vanilla extract
- 25 grams Powdered sugar
- Chocolate shavings or curls to decorate
Instructions
How to make the pie crust
- Place the Oreo cookies in a food processor. Blend until they resemble fine crumbs.
- Melt the butter in short bursts in the microwave. Add the melted butter to the Oreo crumbs and mix it well until it is fully combined with the Oreo crumbs.
- Place half of the Oreo mix into the pie dish, and using your hands, firmly pack the crumbs around the sides of the pie dish. Add the remaining Oreo crumbs into the pie dish and pack firmly on the bottom of the dish. I used a glass to help pack it firmly.
- Place the pie crust in the refrigerator for at least 1 hour to set.
How to make the filling
- Whip the cream with an electric whisk or a stand mixer until it forms stiff peaks, and then cover and place in the fridge. This will take around 3-4 minutes.
- Cut the chocolate into small pieces and set aside.
- Place the eggs and sugar into a bowl over a double boiler/bain-marie (a pot with simmering water that does not touch the bottom of the bowl). Whisk constantly until the mixture reaches 160℉/71℃ when using a candy thermometer. This will take approximately 5-10 minutes.
- Carefully remove the bowl from the heat and stir in the chocolate, salt, and vanilla until the chocolate has fully combined and melted.
- Let the mixture cool, and then stir in the butter a few cubes at a time until fully combined.
- Remove the whipped cream from the fridge and fold in half of the whipped cream until it is fully incorporated, and then add in the remaining half and continue to fold in the cream until it has fully combined with the chocolate mixture.
- Transfer the chocolate filling into the Oreo pie crust and spread it out evenly within the dish using an offset spatula. Let it come to room temperature then cover and place in the fridge to set for at least 4 hours or overnight.
How to make the topping
- Make the topping once the filling has set.
- Pour the cold cream into a large bowl and add the powdered sugar and vanilla extract.
- Using an electric whisk, whisk until soft peaks form.
- Spread the whipped cream on top of the set filling. You can also pipe the cream on if you want a fancier finish. I scooped the cream using a spoon and then used an offset spatula to gently spread it over the top of the pie.
- Sprinkle the top of the cream with shaved chocolate or chocolate curls to decorate.
Notes
- Tip #1: Packing the sides of the pie dish with the Oreo crumbs first will make it easier to get an even pie crust.
- Tip #2: If you don't have a thermometer when making the filling, you can test that it is done, as it will look fluffy and pale. When you rub the mixture between your finger and thumb, it will be very hot, and you will not be able to feel any sugar granules as it has all dissolved (This does not guarantee that the eggs are cooked, so this is dependent on your own judgement).
- Tip #3: The filling will look thicker but still runny when transferring it to the pie dish, but the mixture will thicken more and firm up as it sets in the fridge.
- Tip #4: Watch the cream closely as you whip it. Over-whipping can cause the cream to turn into butter, although under-whipping will result in a runny cream. You want the cream to form beautiful, soft peaks when you lift the beaters. If you overbeat, mix in a little extra cream to help improve the texture.
Nutrition
Disclaimer
Nutritional information is meant as a guideline and is always an approximate calculation. Recipes may include information of various products used. It is your responsibility to check that ingredients you use when making a recipe are gluten free.


Amanda says
Thank you for visiting. I hope you love the recipe!