When I'm craving chocolate cake, this is exactly what comes to mind! This gluten free chocolate fudge cake is so rich, moist, and deeply chocolaty, finished with a glossy chocolate fudge frosting that's pure indulgence in every slice.

I love all my chocolate cake recipes, but I have to say that this one is my favorite for its richness and glossy frosting that I could just eat straight from the bowl! I guarantee once you have tried it, you will be just as obsessed.
If you are looking for more gluten free cakes that are great for birthdays or celebrations, then also see my gluten free funfetti cake, gluten free strawberry cake, and gluten free lemon meringue cake.
Jump to:
📸 Recipe Snapshot
⏱ Prep & Cook Time: around 25 minutes prep time and 35 minutes cook time.
👩🍳 Skill Level: beginner-friendly, suitable for novice bakers, doesn't require any advanced baking skills or equipment.
🥄 Servings: up to 20 servings.
🍫 Flavors & textures: rich, moist chocolate cake with a smooth, glossy chocolate fudge frosting.
📖 Dietary Notes: gluten free, nut free.
❄️ Make Ahead: can be made a few days ahead of time. individual slices can be frozen.
🍽️ Serving Suggestion: serve at room temperature with fresh cream or chantilly cream.
Recipe Development
When making this gluten free chocolate fudge cake, I wanted it to be an 8-inch layered cake, making it perfect for a decadent dessert or the perfect birthday or celebration cake.
I slightly adapted the chocolate cake recipe from my chocolate crunch cake by adding espresso coffee to enhance the cocoa flavor and adding buttermilk to add more moisture and a richer flavor.
For the chocolate fudge frosting, I adapted my chocolate ganache frosting from my gluten-free dark chocolate cake recipe and added butter and powdered sugar to make a richer, glossier, fudgier finish, then salt and vanilla to enhance the flavor.
The cakes can also be made in 2 9-inch cake pans if you prefer a two-layer cake. Keep an eye on the bake time, as it will take slightly longer in the oven, as you don't want to overbake, causing the cakes to become dry.
📋 Ingredients Notes

- Heavy Cream - Using heavy cream, heavy whipping cream or double cream is essential when making the chocolate fudge frosting. The fat content in the cream will result in the correct texture as the higher fat content helps emulsify the frosting, binding the chocolate and cream together into a smooth, silky frosting that is stable.
- Dark Chocolate - Be sure to use dark chocolate that has a minimum of 54% cocoa solids. Always check that the chocolate is gluten free as some brands may contain gluten.
- Gluten free All-purpose flour - I used a shop bought Gluten free Plain flour blend from Doves Farm Freee from range. Which is a flour blend of Rice, Potato, Tapioca, Maize and Buckwheat flour. I have had reports that others have used Bob’s Red Mill and other Gluten free All purpose blends with my recipes that have worked well.
- Sugar - This makes the cake light, gives moisture, and adds sweetness to the cake. I used fine white sugar, aka caster sugar, but granulated sugar will also work well. I used powdered sugar in the frosting, it dissolves more easily and will balance out the bitterness of the dark chocolate.
- Cocoa powder - Dutch-processed cocoa powder is what I used.
- Baking Powder & Baking soda - Acts as a leavening and rising agent by reacting to heat. Making the cake light and rise well.
- Salt - Helps balance out the sweetness of the chocolate cake.
- Xanthan Gum - Prevents ingredients from separating as it is a stabilizer. Essentially acting as gluten would gel everything together. You can omit this if the flour blend contains xanthan gum.
- Butter - Melted in the microwave.
- Buttermilk - This will also add moisture to the cake and will help intensify the chocolate flavor. I like to take the buttermilk out of the refrigerator 30 minutes before making the cake to allow the milk to come to room temperature. If you don't have buttermilk, just substitute regular whole milk.
- Eggs - Room temperature
- Coffee - I used instant espresso coffee. Don't skip this step, as adding hot water will add moisture to the chocolate cake and prevent it from becoming too dry and the coffee will enhance the chocolate flavors.
See the recipe card below for ingredient measurements.
⚡ Substitutions & Variations
- Milk - if you don't have buttermilk available then you can use whole milk.
- Dairy free - I haven't tested this cake dairy-free, but I would substitute the butter, chocolate, and milk to a good quaility dairy free alternative. If you do try to make this dairy free I would love you to come back and leave a comment on how it turned out, as it's also a great help to others.
- No coffee - you can't taste the coffee in the cake, and it does enhance the flavors, but if you prefer, you can omit the coffee but still add the hot water.
🥣 Step by Step Instructions
Below is a brief step-by-step process with photos of how to make a gluten free chocolate fudge cake.
See the recipe card below for more detailed recipe instructions.
Make the chocolate fudge frosting
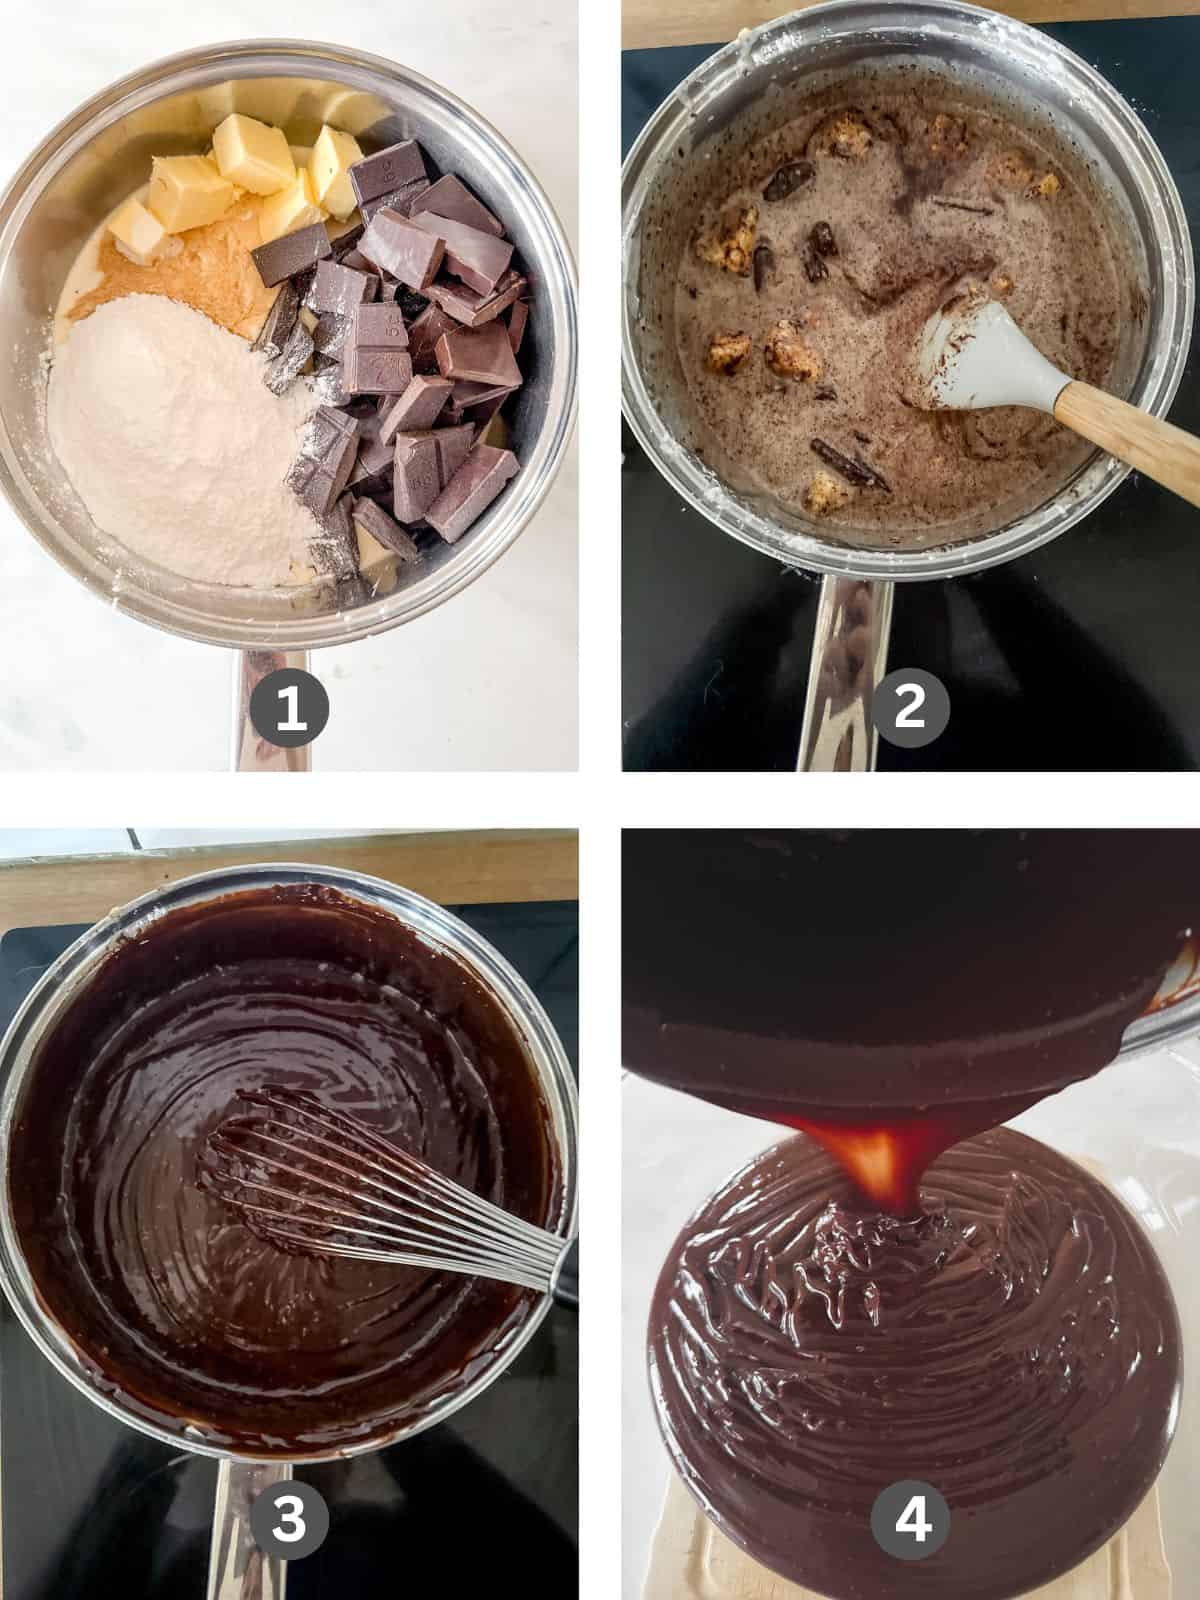
Step 1: Place the dark chocolate, cream, powdered sugar, butter, vanilla extract, and salt all in a pan over medium heat.
Step 2: Stir until the chocolate and butter has melted and everthing is mixed together well.
Step 3: Remove from the heat and whisk lightly for a couple of minutes to be sure that there are no lumps.
Step 4: Pour the chocolate fudge mixture into a bowl and set aside to cool.
Once cooled, cover and refrigerate to firm up.
Tip: Only whisk lightly for a couple of minutes to get out any small lumps, as we don't want whipped frosting. You can sieve the frosting if preferred.
Make the gluten free chocolate cake

Step 5: Melt the butter and set it aside to cool slightly. Mix the hot water and coffee in a jug or mug and also set aside to cool slightly.
In a large bowl, mix together flour, sugar, baking powder, baking soda, cocoa powder, xanthan gum, and salt.
Step 6: In a separate bowl, combine the eggs, buttermilk, melted butter, and coffee mixture and mix well.
Step 7: Add the wet ingredients to the dry ingredients and whisk until smooth. Set aside to let the batter rest and hydrate for up to 15 minutes.
Preheat the oven to 170°C/325°F/Gas Mark 3. Line the sides and bottom of the baking pans with parchment paper.
Step 8: Divide the chocolate cake batter evenly between the three baking pans. Place in the oven and bake for 20–25 minutes. Insert a skewer into the center of a cake. If it comes out clean, the cakes are ready, if not bake for a little longer.
Tip: Be sure to check that the melted butter and coffee have cooled down slightly, as you don't want the eggs to start cooking when added to hot butter and coffee. I like to weigh each of the baking pans to check that the cake batter is evenly divided.
Assemble the gluten free chocolate fudge cake

Step 9: Transfer to a cooling rack. Carefully remove from the tins once slightly cooled as the cake will be delicate to handle.
Step 10: Once the cakes have fully cooled, you can begin assembling.
If your cake has large domes, you can use a serrated knife to remove the domes to result in a flat top. I find that these cakes don't have a large dome and need very little to no leveling.
Remove the chocolate fudge frosting from the refrigerator. It should be thick but spreadable. If it has been left in the fridge for too long, you might need to let it sit at room temperature until it softens slightly, making it more spreadable.
Place the first layer on your cake stand or plate and use approx ¼ of the frosting layer and spread evenly. Then carefully layer with the second chocolate cake and repeat the frosting. Top with the final layer of cake.
Steps 11-12: With the remaining frosting, cover the top and sides of the cake. If desired, use the back of a spoon or spatula to create swirls around the top and sides of the cake.
💡 Pro Recipe Tips
- Tip #1: Using good quaility ingredients will make all the difference with the end result.
- Tip #2: Using a digital scale to weigh ingredients will make sure that your measurements are correct and is essential when baking for consistent results.
- Tip #3: Using an oven thermometer will ensure that the oven is at the correct temperature as some ovens run hotter than others.
- Tip #4: Only whisk the chocolate fudge frosting lightly for a couple of minutes to get out any small lumps, as we don't want whipped frosting. You can sieve the frosting if preferred.
- Tip #5: Be sure to check that the melted butter and coffee have cooled down slightly, as you don't want the eggs to start cooking when added to hot butter and coffee.
- Tip #6: I like to weigh each of the baking pans to check that the cake batter is evenly divided.

❔ Recipe FAQs
Store in an airtight container for up to 2 days at room temperature. In the fridge for up to 5 days, allow slices to come to room temperature before serving. I have frozen leftover individual slices wrapped in parchment paper, then in a freezer bag. Defrost at room temperature for a few hours or overnight in the fridge.
Yes, this recipe can be made a few days in advance.
I haven't tested this cake dairy-free, but I would substitute the butter, chocolate, and milk to a good quaility dairy free alternative. If you do try to make this dairy free I would love you to come back and leave a comment on how it turned out, as it's also a great help to others.
If you are a lover of all things chocolate, then also check out my thick chocolate milkshake, strawberry and chocolate ganache tartlets, Oreo tart, and chocolate French silk pie.
More gluten free chocolate cake recipes


If you tried this gluten free chocolate fudge cake recipe. Please leave a star 🌟rating in the recipe card below & a review in the comments section further down the page. Subscribe and get free recipes straight to your inbox.
📖 Recipe

Gluten Free Chocolate Fudge Cake
Nutritional information is meant as a guideline and all information is approximate.
Equipment
- 3 8 inch cake pans
Ingredients
Ingredients for chocolate fudge frosting
- 500 grams dark chocolate chopped
- 500 milliliters heavy cream
- 200 grams powdered sugar
- 150 grams unsalted butter diced
- 1 teaspoon vanilla extract
- ¼ teaspoon salt
Ingredients for gluten free chocolate cake
- 300 grams gluten free all purpose flour
- 300 grams sugar
- 70 grams unsweetened cocoa powder
- 1 ½ teaspoons baking powder Some brands contain gluten, always check to be sure it is gluten free.
- 1 ½ teaspoons baking soda
- ½ teaspoon salt
- ½ teaspoon xanthan gum omit if the flour contains xanthan gum
- 300 grams unsalted butter melted
- 300 milliliters buttermilk
- 3 large eggs room temperature
- 90 milliliters hot water
- 1 teaspoon instant coffee
Instructions
How to make chocolate fudge frosting
- Place the dark chocolate, cream, powdered sugar, butter, vanilla extract, and salt all in a pan over medium heat.
- Stir until the chocolate and butter has melted and everthing is mixed together well.
- Remove from the heat and whisk lightly for a couple of minutes to be sure that there are no lumps.
- Pour the chocolate fudge mixture into a bowl and set aside to cool.
- Once cooled, cover and refrigerate to firm up.
How to make gluten-free chocolate cake
- Melt the butter and set it aside to cool slightly. Mix the hot water and coffee in a jug or mug and also set aside to cool slightly.
- In a large bowl, mix together flour, sugar, baking powder, baking soda, cocoa powder, xanthan gum, and salt.
- In a separate bowl, combine the eggs, buttermilk, melted butter, and coffee mixture and mix well.
- Add the wet ingredients to the dry ingredients and whisk until smooth. Set aside to let the batter rest and hydrate for up to 15 minutes.
- Preheat the oven to 170°C/325°F/Gas Mark 3. Line the sides and bottom of the baking pans with parchment paper.
- Divide the chocolate cake batter evenly between the three baking pans ( I like to weigh each of the pans to check I have evenly distributed the cake batter). Place in the oven and bake for 20–25 minutes. Insert a skewer into the center of a cake. If it comes out clean, the cakes are ready, if not bake for a little longer.
- Transfer to a cooling rack. Carefully remove from the tins once slightly cooled as the cake will be delicate to handle.
Assembling the gluten free chocolate fudge cake
- Once the cakes have fully cooled, you can begin assembling.
- If your cake has large domes, you can use a serrated knife to remove the domes to result in a flat top. I find that these cakes don't have a large dome and need very little to no leveling.
- Remove the chocolate fudge frosting from the refrigerator. It should be thick but spreadable. If it has been left in the fridge for too long, you might need to let it sit at room temperature until it softens slightly, making it more spreadable.
- Place the first layer on your cake stand or plate and use approx ¼ of the frosting layer and spread evenly. Then carefully layer with the second chocolate cake and repeat the frosting. Top with the final layer of cake.
- With the remaining frosting, cover the top and sides of the cake. If desired, use the back of a spoon or spatula to create swirls around the top and sides of the cake.
Notes
- Tip #1: Using good quaility ingredients will make all the difference with the end result.
- Tip #2: Using a digital scale to weigh ingredients will make sure that your measurements are correct and is essential when baking for consistent results.
- Tip #3: Using an oven thermometer will ensure that the oven is at the correct temperature as some ovens run hotter than others.
- Tip #4: Only whisk the chocolate fudge frosting lightly for a couple of minutes to get out any small lumps, as we don't want whipped frosting. You can sieve the frosting if preferred.
- Tip #5: Be sure to check that the melted butter and coffee have cooled down slightly, as you don't want the eggs to start cooking when added to hot butter and coffee.
- Tip #6: I like to weigh each of the baking pans to check that the cake batter is evenly divided.
Nutrition
Disclaimer
Nutritional information is meant as a guideline and is always an approximate calculation. Recipes may include information of various products used. It is your responsibility to check that ingredients you use when making a recipe are gluten free.


Amanda says
Thank you for visiting. I hope you love the recipe!