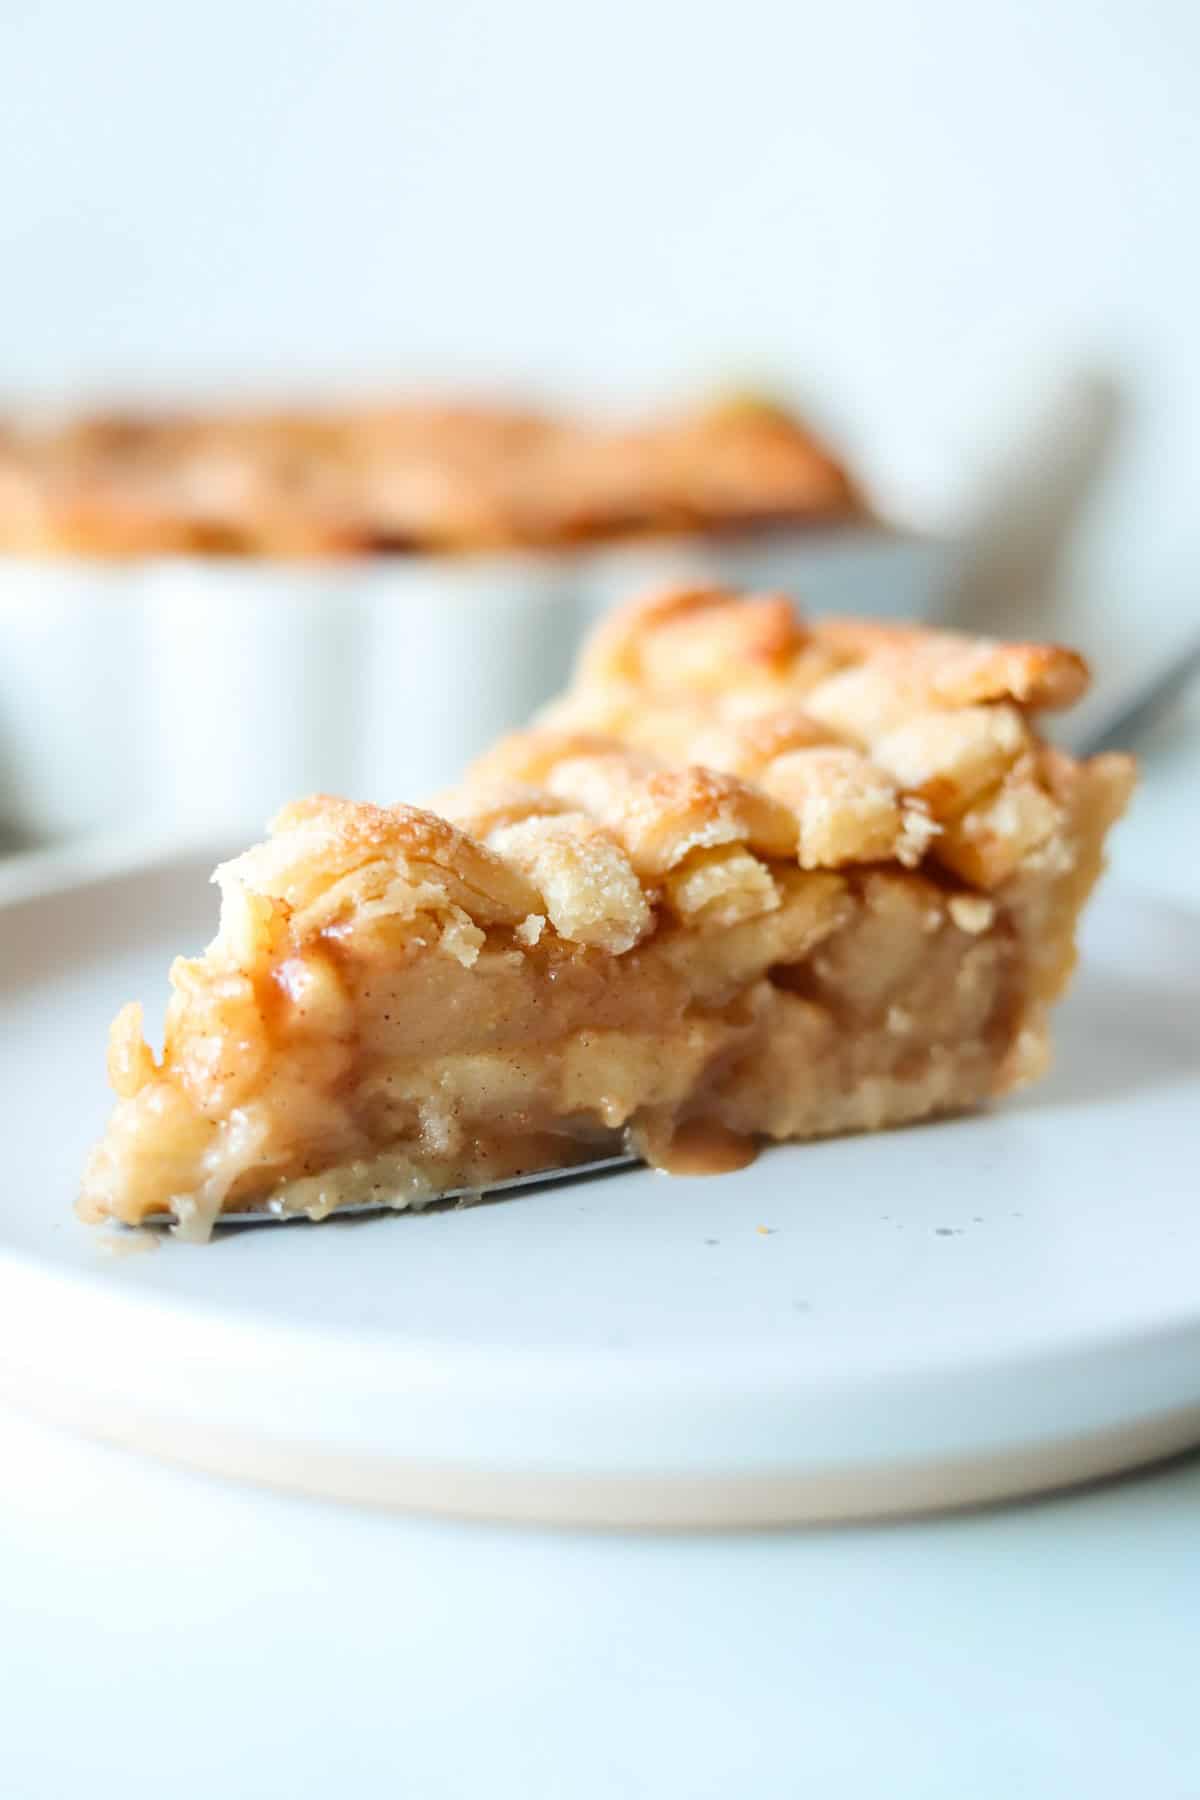
Apple pie is hands down my favorite fall dessert. This gluten free apple pie made from scratch is filled with layers of fresh, juicy apples covered in sugar, cinnamon, and nutmeg. Wrapped in my delicious golden gluten free pie crust.
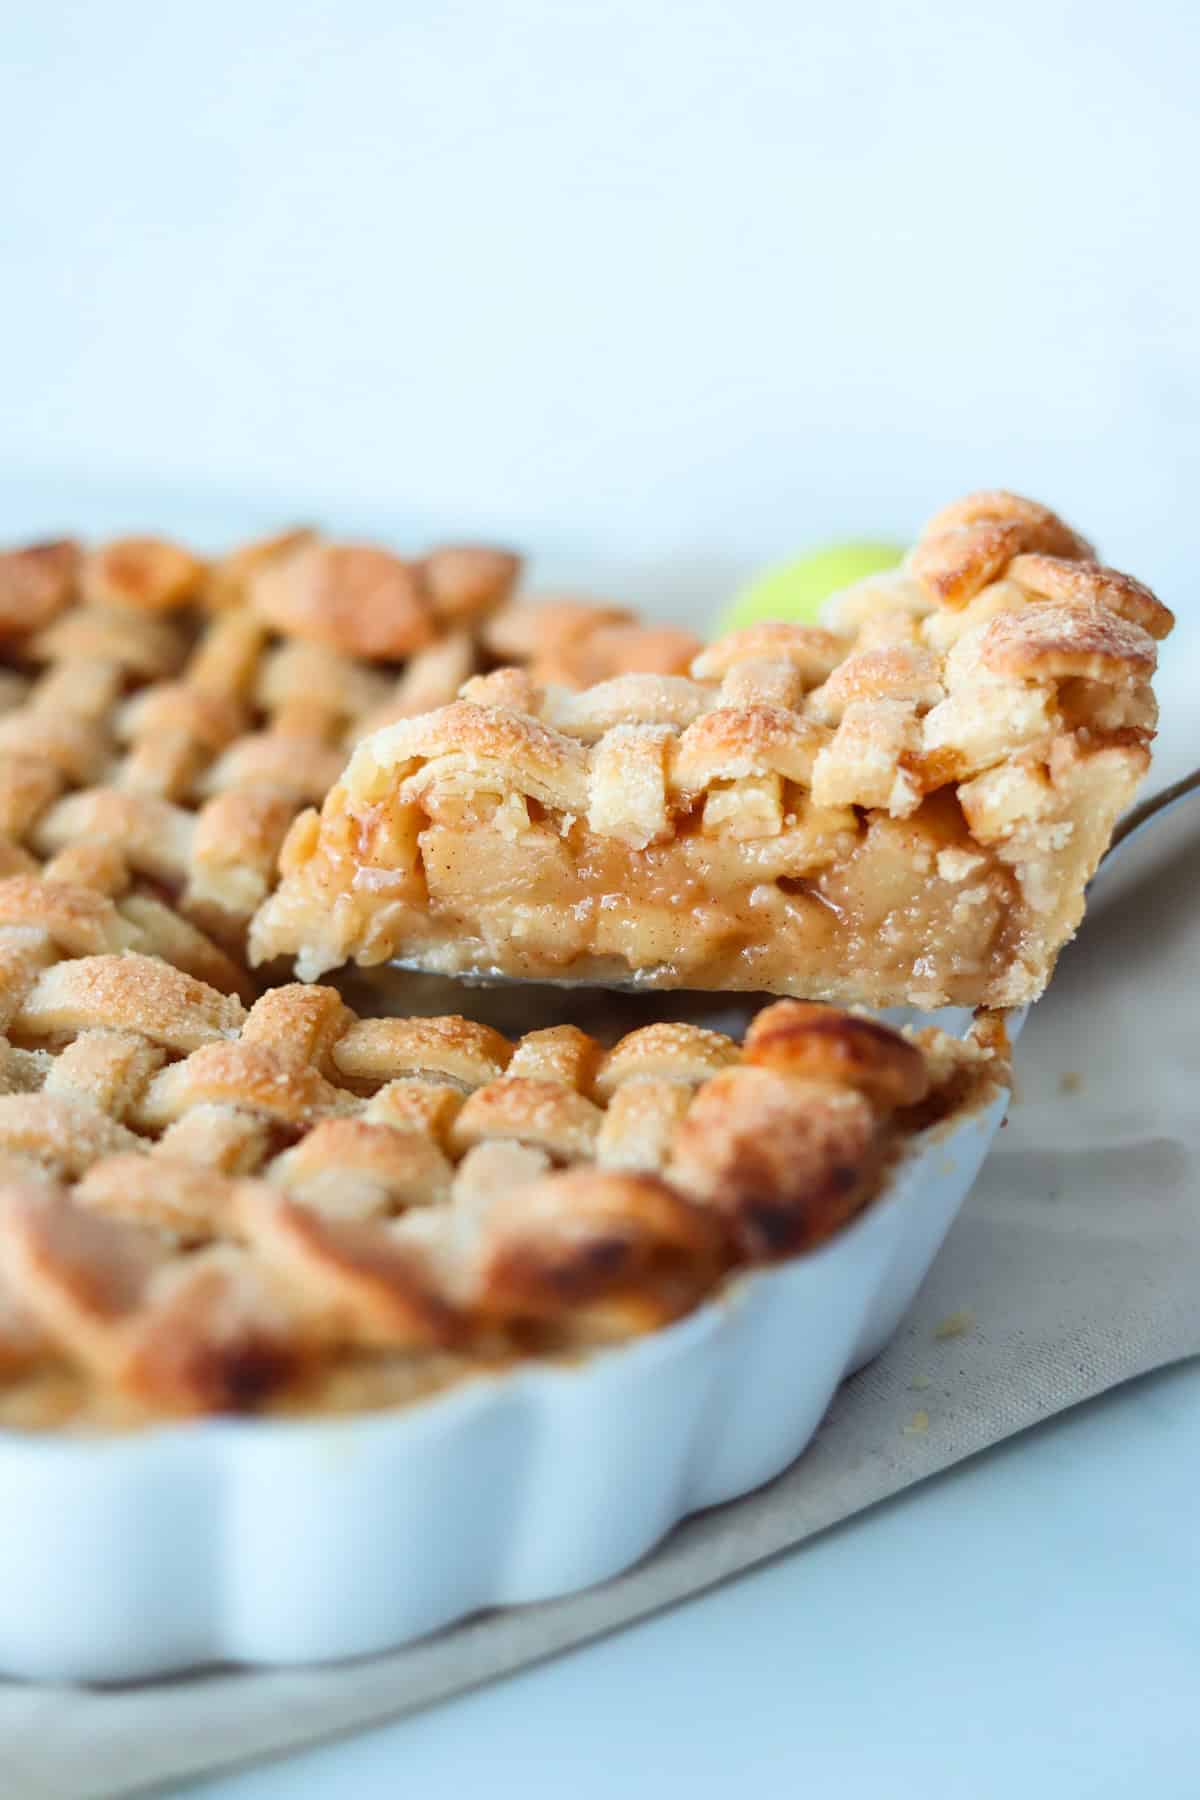
Anything sweet that comes in a pie is a winner in my book but when its apples and fall spices then I just can't resist!
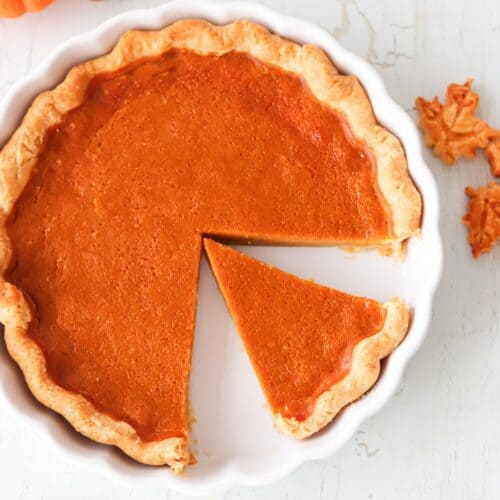
I just love this time of year when I make lots of gluten free pie dough and gluten free shortcrust pastry and store them in the fridge or freezer ready to make all the holiday favorites such as gluten free pumpkin pie, gluten free mince pies, and gluten free blueberry pie.
Gluten free apple cake, and apple and blueberry crumble are also great gluten free apple desserts.
Jump to:
⭐ Why we love this recipe
- Gluten Free - made from scratch with gluten free ingredients without compromising on taste and texture.
- Full of Flavor - this gluten free apple pie has just the right amount of fall spices that complement the tart apple flavors.
- Easy step-by-step instructions - Easy to follow recipe with step by step photos.
- Perfect Holiday Dessert - although apple pie can be enjoyed anytime of year, it does make a great holiday dessert that can be made ahead.
Recipe Development
I've been making gluten-free apple pie for years, and depending on how I'm feeling or the time of year I have different versions of this family favorite from caramel apple pie, apple pie without cinnamon, apple pecan pie, apple pie and the list goes on.
So it was difficult to decide what version to share here and I decided to go with the classic fall flavors with the buttery gluten free lattice pie crust. It's simple to make and tastes amazing.
I have in the past shared my gluten free apple crumble pie which uses my gluten free shortcrust pastry, and plan to also add some more of my apple pie recipes in time for you to try.
📋 Ingredients Notes
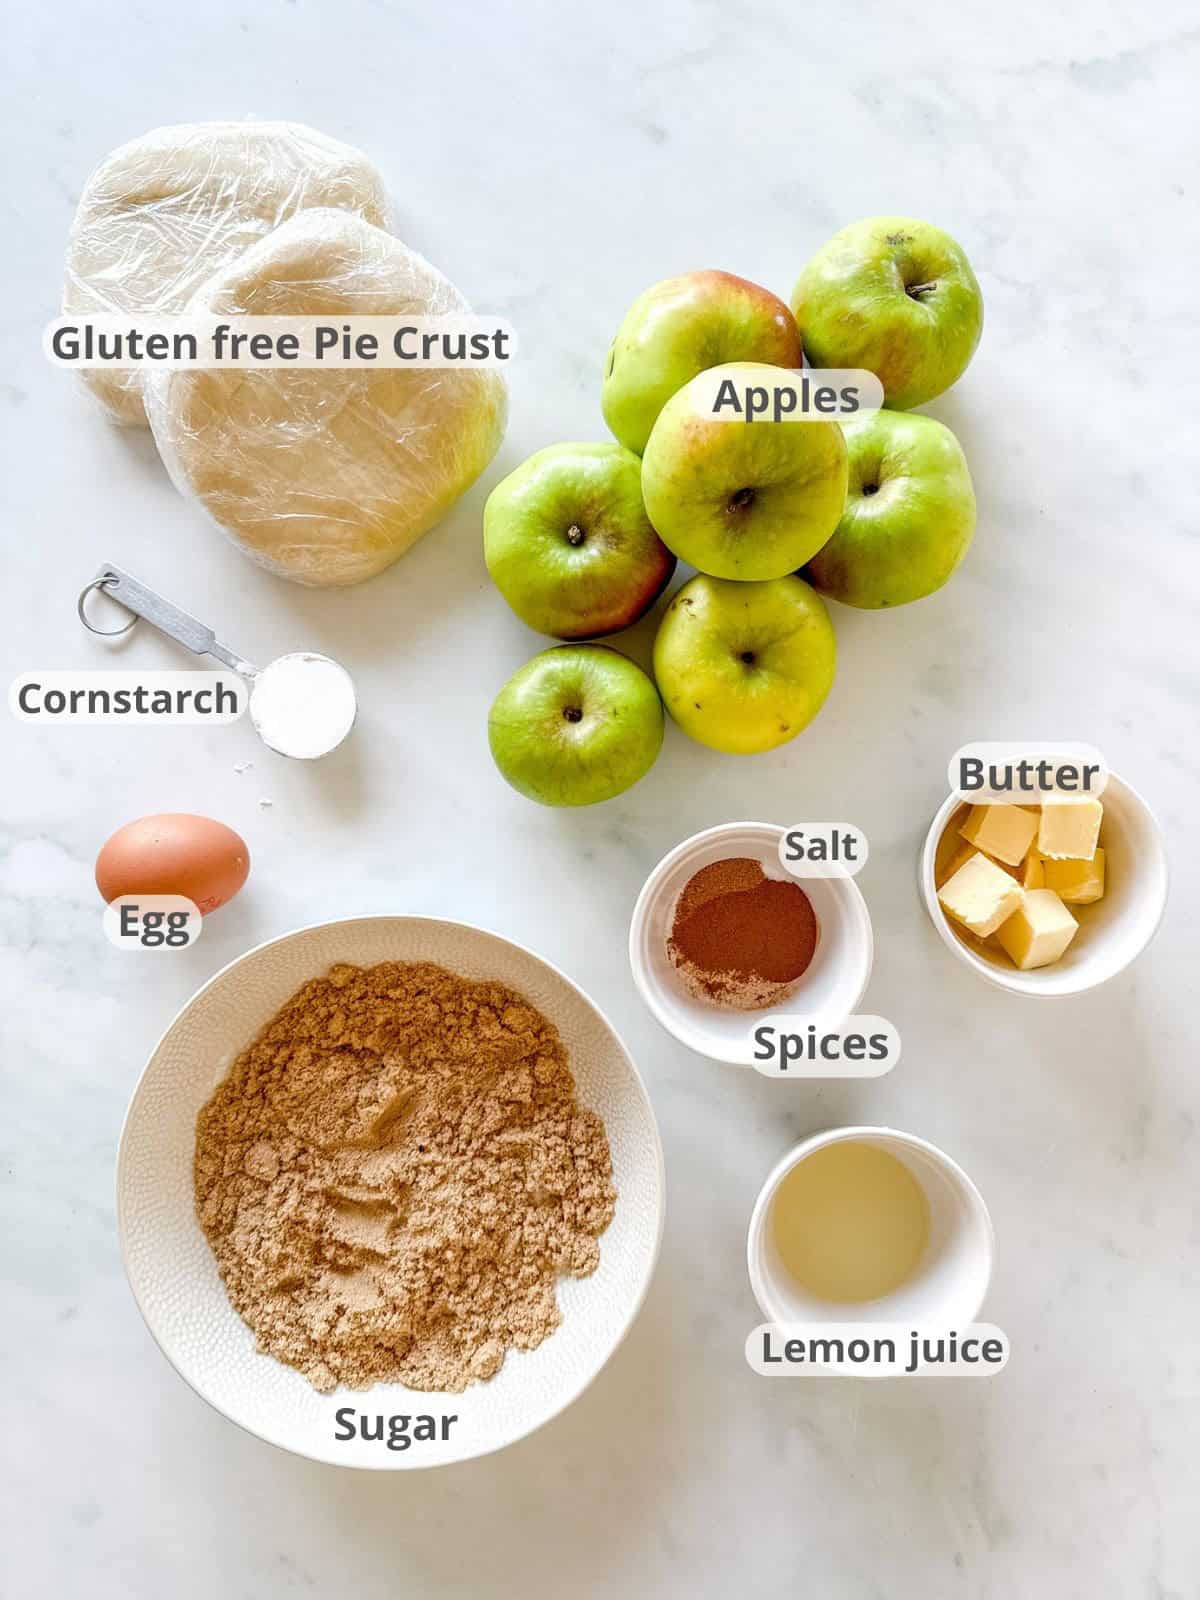
- Gluten free pie crust - I used my gluten free pie crust recipe and have put all the details on how to make this below, but you can use your preferred pie crust.
- Apples - varieties of apples that sre great for apple pie are granny smith which is slightly more tart or Honeycrisp, which is slightly tart and sweet.
- Lemon juice - Lemon juice serves a dual purpose, it shields the apples from browning while balancing their sweetness and tartness.
- Sugar - I used light brown sugar in the filling, which adds sweetness, a rich caramel flavor, and moisture to the apples. I used white sugar to sprinkle on top of the pie crust.
- Spices - this gluten free apple pie uses both ground cinnamon and nutmeg, as it just the perfect fall flavors that complement each other and the apples perfectly.
- Salt - don't skip the salt as this enhances the flavors of the pie filling.
- Cornstarch - thickens up the juices of the apples. See my cornstarch v cornflour post.
- Butter - I used unsalted butter, the butter combined with the juices of the apples and spices makes for a lush apple pie filling.
- Egg - For egg wash
See the recipe card below for ingredient measurements.
⚡ Substitutions & Variations
- Shortcrust pastry - I also sometimes use my gluten free shortcrust pastry when making apple pie.
- Dairy Free - Use your preferred dairy free butter block.
🥣 Step by Step Instructions
Below is a brief step-by-step process with photos of how to make gluten free apple pie.
See the recipe card below for more detailed recipe instructions.
I have included information on how to make my gluten free pie crust. You can use your preferred recipe. I recommend checking out my full post for my gluten free pie crust recipe, as it's packed full of tips.
Make the Pastry Dough
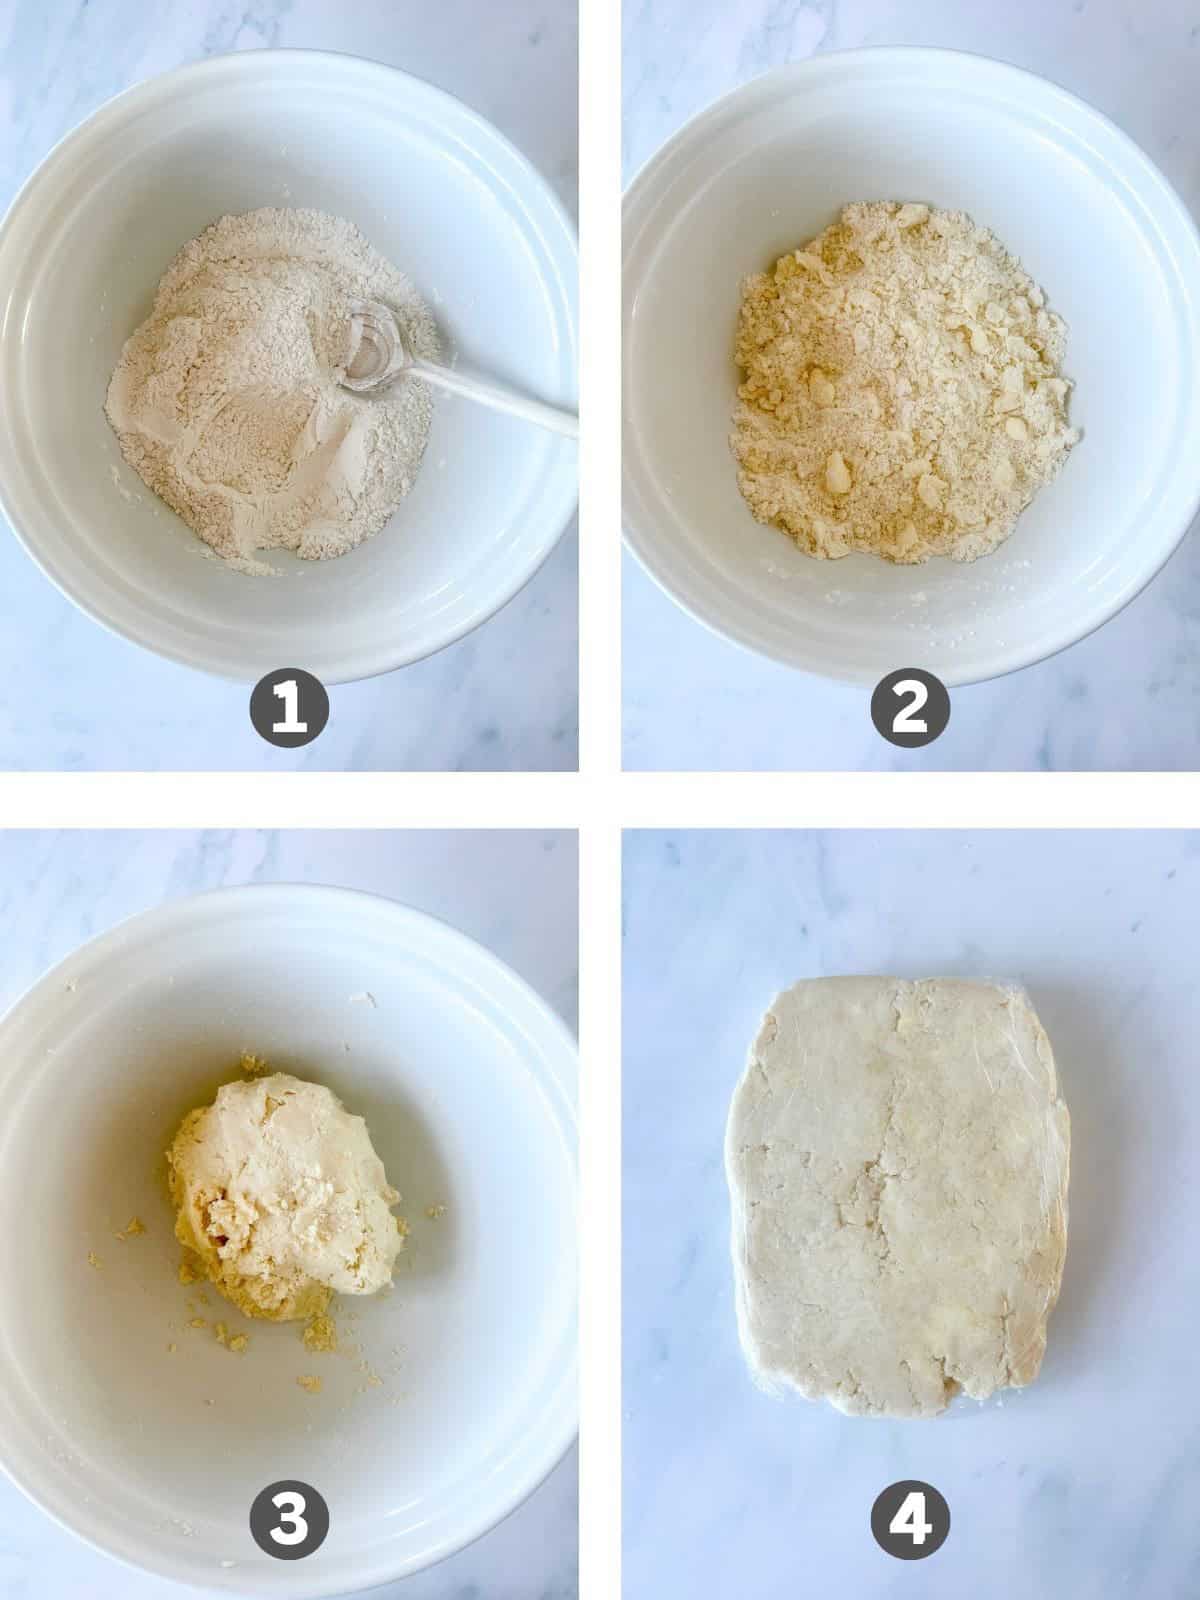
Step 1: Add the flour, sugar, and xanthan gum, into a large bowl and mix together. Place the cubed butter into the bowl and coat all the pieces with flour.
Step 2: Using your fingers, press the butter into the flour until the cubes of butter are around large pea-sized, leaving some pieces of butter slightly larger (work quickly as you want to keep the butter cold and not melt during this step).
Step 3: Add the cold water a few tablespoons at a time and mix into the butter and flour mixture. Continue this until the dough comes together well but is not wet and sticky (I used 100 grams of water, if it is too dry slowly adding additional water if needed). Do not knead the dough, as we want to see chunks of butter within the dough. See images in the post above.
Step 4: Squeeze the dough together to make a rectangular shape. Wrap in plastic wrap and place the dough in the fridge to rest and chill for around 1 hour.
Tip: Work quickly as you want to keep the butter cold and not melt during this step. Do not knead the dough, as we want to see chunks of butter within the dough see image 4.
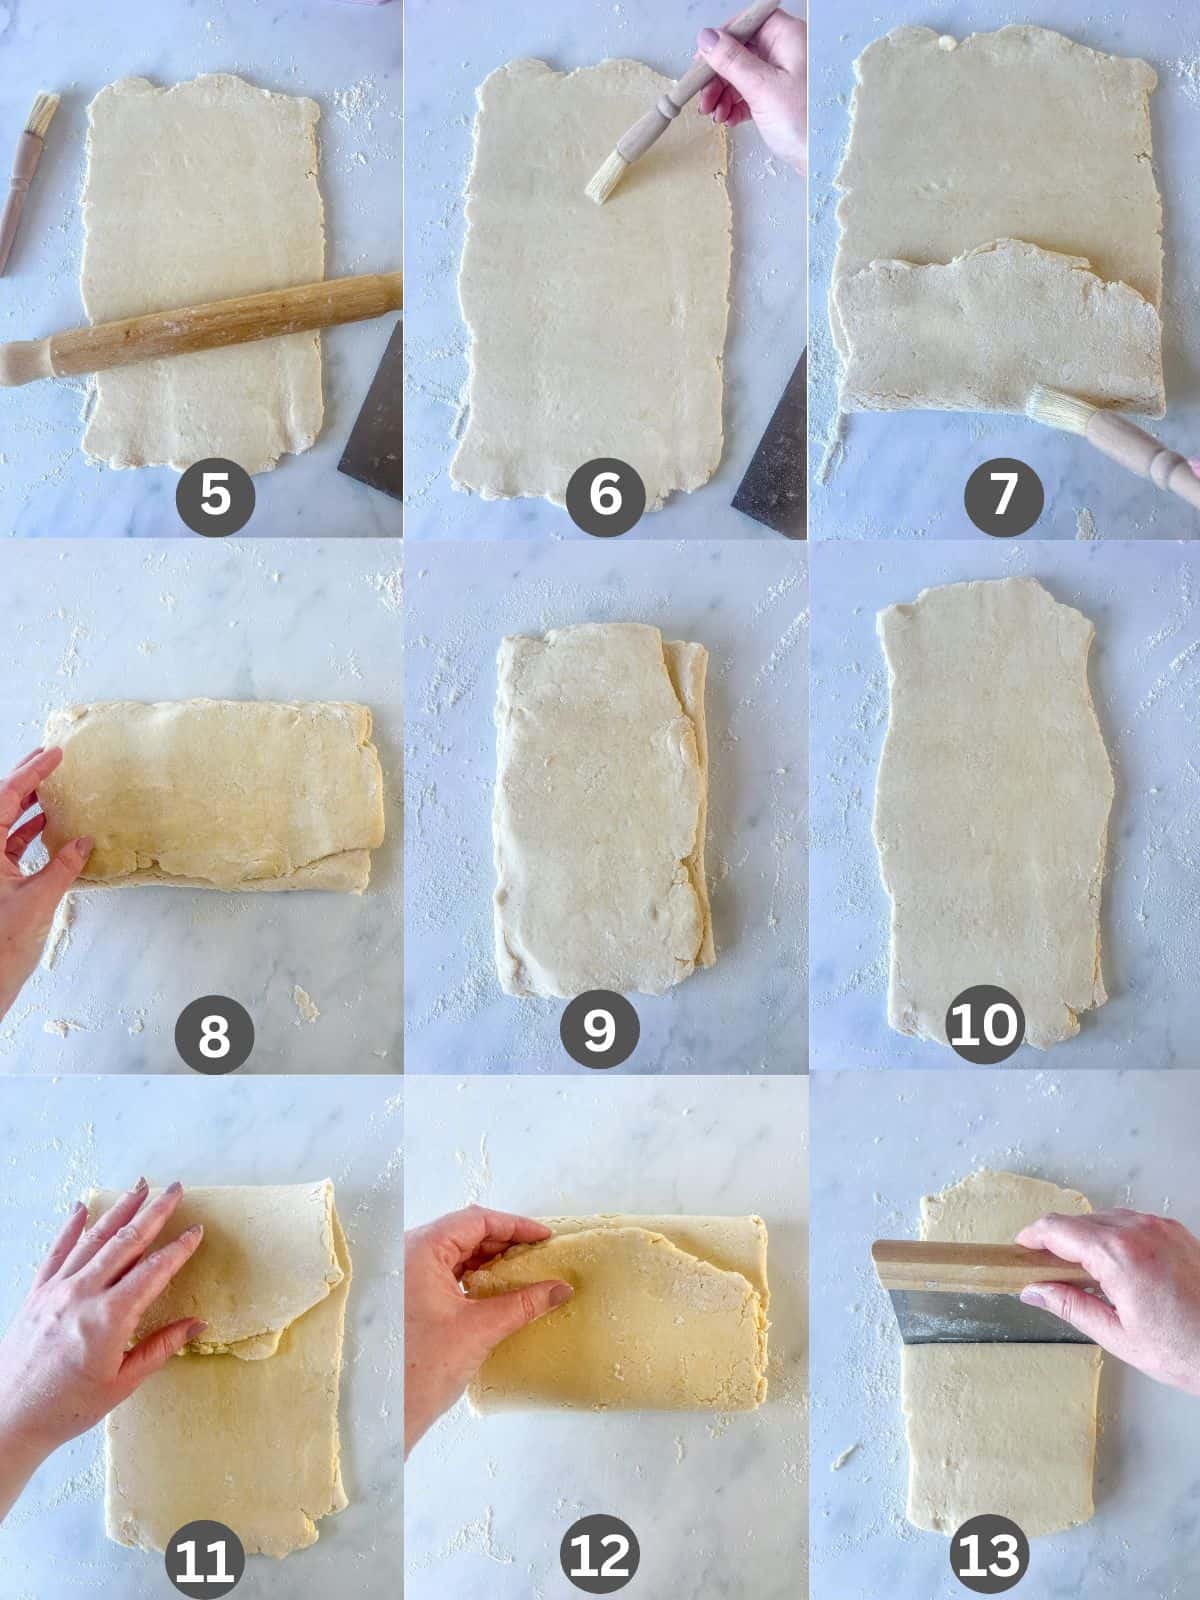
Step 5-13: Once the pie dough has chilled, it's time to laminate the dough. Roll out the dough onto a lightly floured surface. Brush any excess flour off the top of the dough. Fold the dough into thirds like a letter. Rotate the dough and roll it out into a rectangle shape again, and then repeat the letter folds. Repeat this one more time. (I usually do this 3-4 times in total).
Roll out the dough until it is around 10 inches long and 1 inch thick. Divide the dough in half and shape it into a disk. Wrap each disk well with plastic and place them in the fridge for at least 1 hour, longer if the kitchen is warm.
Tip: My dough weighs 700g in total, and I divide it up by 400g for the bottom pie crust and 300g for the pie top.
Make the Apple Pie Filling
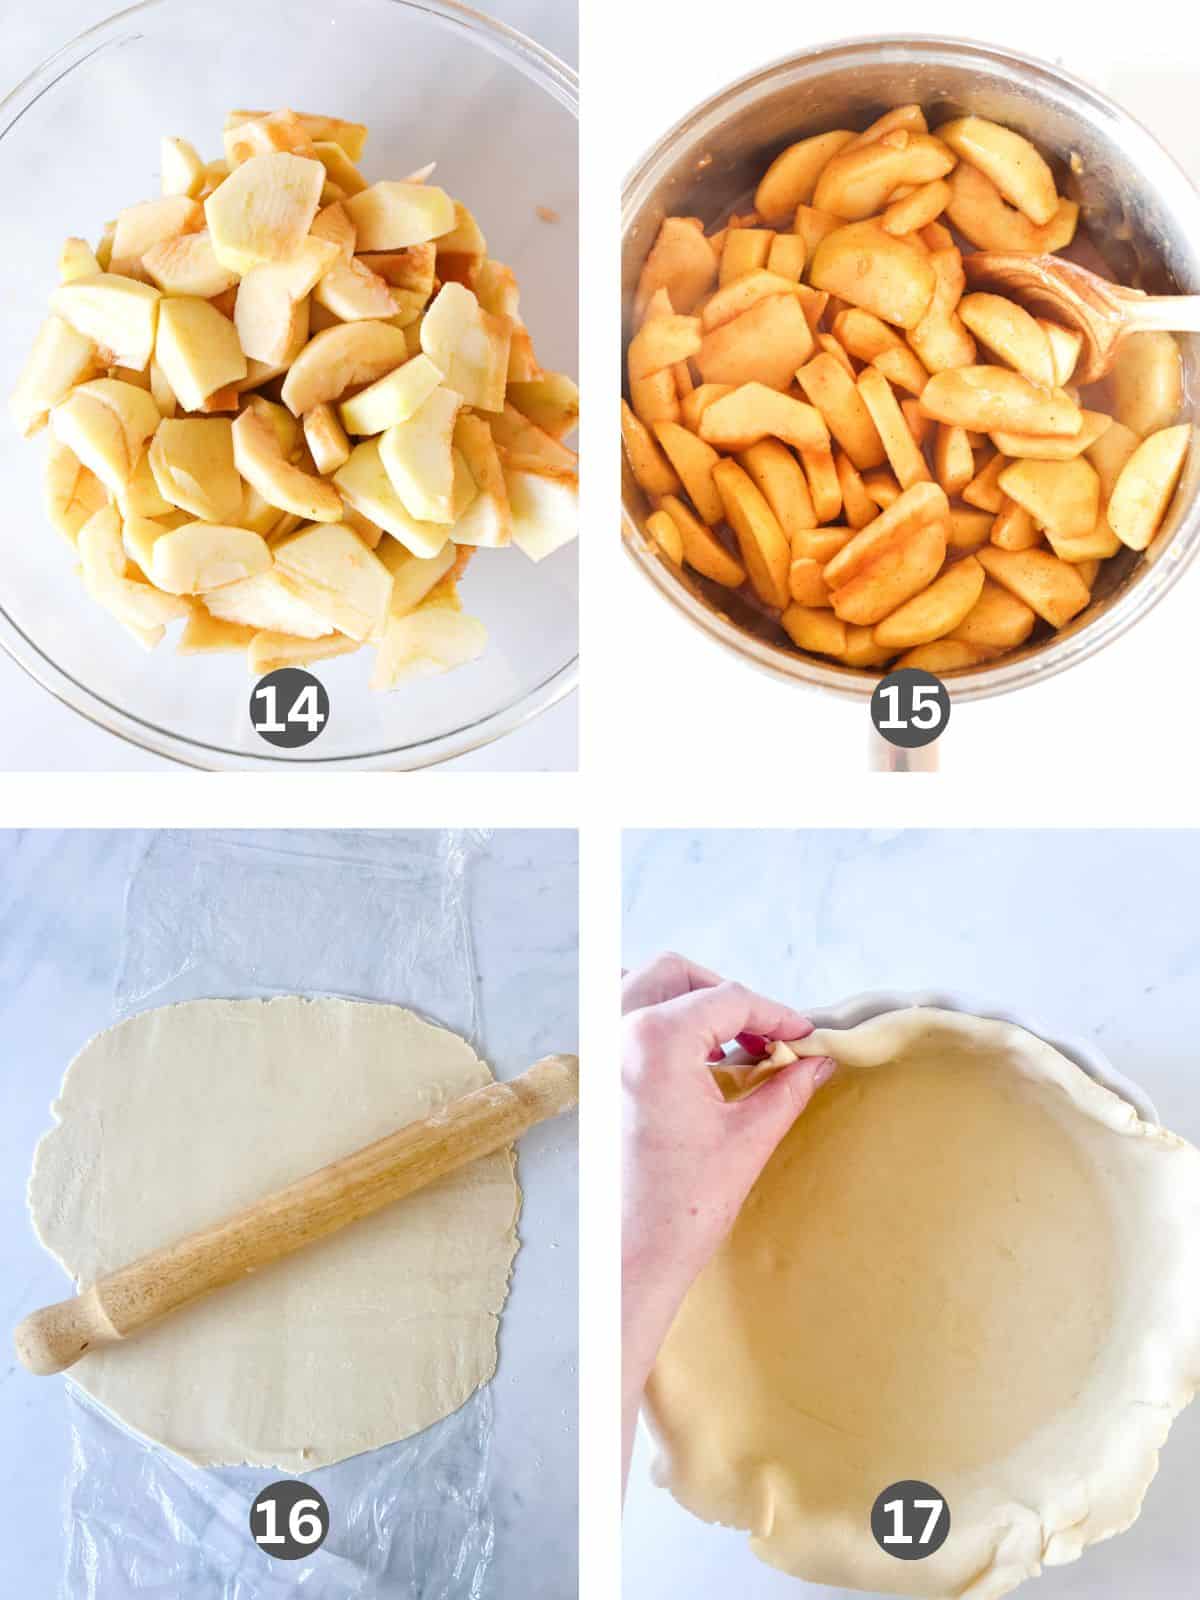
Step 14: Peel, core, and slice the apples into thin, even-sized slices and place in a large bowl.
Mix lemon juice, sugar, cinnamon, nutmeg, salt, and cornstarch into the bowl of sliced apples and set aside.
Step 15: In a large pan over a low to medium heat, melt the butter. Add in the sliced apples to the pan, being sure to add any juices that have developed at the bottom of the bowl.
Stir occasionally for approximately 10 minutes or until the apples have softened. Remove the pan from the heat and set aside while you prepare the pie base.
Step 16: Roll out the larger pie dough evenly until it is around a 12-inch circle. To make rolling the pie dough easier, I like to roll it out parchment paper or Plastic wrap. (This will prevent it from sticking, and there is no need for extra flour on your surface, which prevents the pastry from drying out. It also makes the dough easier to lift onto the pie dish by lifting up the plastic wrap and then flipping it over the pie dish).
Step 17: Carefully transfer the dough without stretching it onto the 9 inch pie dish. Gently press the dough into the bottom and sides of the dish. Trim any excess dough around the edges of the pie dish leaving around 1 inch around the edge of the dish. Fold and tuck the excess dough around the inner edge of the pie dish. This will make a neat, thicker crust around the edge of the pie that is easier to shape.
Crimp the edge of the crust. The shape of the crimp is your own personal style or preference. I usually like to use my fingers by creating a small v shape around the edges but you can also use a crimping tool or a fork. (This time I wasn't too fussy as I used left over pastry to make a leaf border around the pie rim). Place the pie dish in the fridge for the dough to firm up while you make the pie top.
Tip: Chilling the dough after it is placed in the dish will help it firm back up and prevent shrinking during baking.
Assemble and Bake
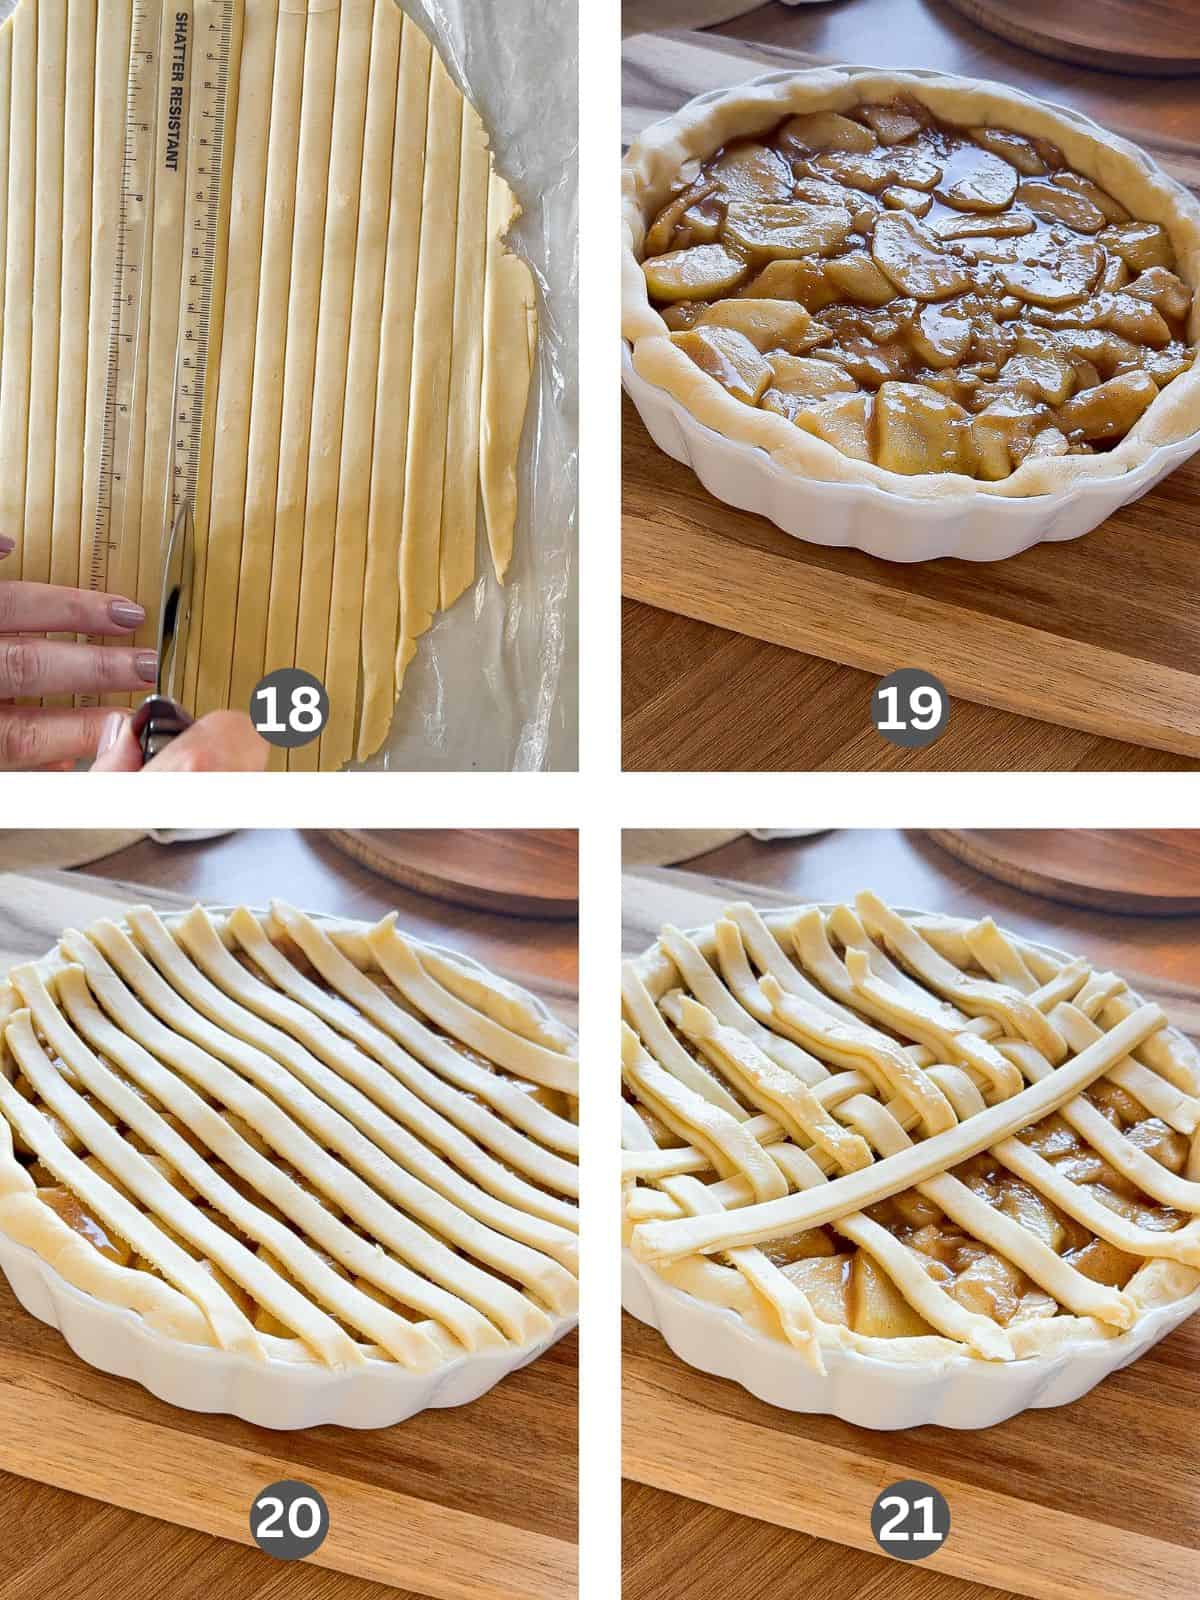
Step 18: I made a lattice pie top by rolling out the other pastry disk and cutting even straight lines to make strips using a pizza cutter and a ruler. You can roll out the disk into a circle and have a full pie lid or make your own creative design.
Step 19: Remove the pie dish from the fridge and transfer the cooled apples and juices into the dish, pressing it down evenly to be sure there are no gaps in the filling.
Step 20-21: Carefully place the top pie crust onto the pie dish. and crimp the edges with the bottom pie crust using a crimper or fork to seal the pastry. If making a lattice top, see my images above for some guidance on how to do this. I used any leftover pastry dough to make leaves to decorate the edge of the pie.(If making a full pie top be sure to cut some vents in the center of the pie crust to allow steam to be released during baking).
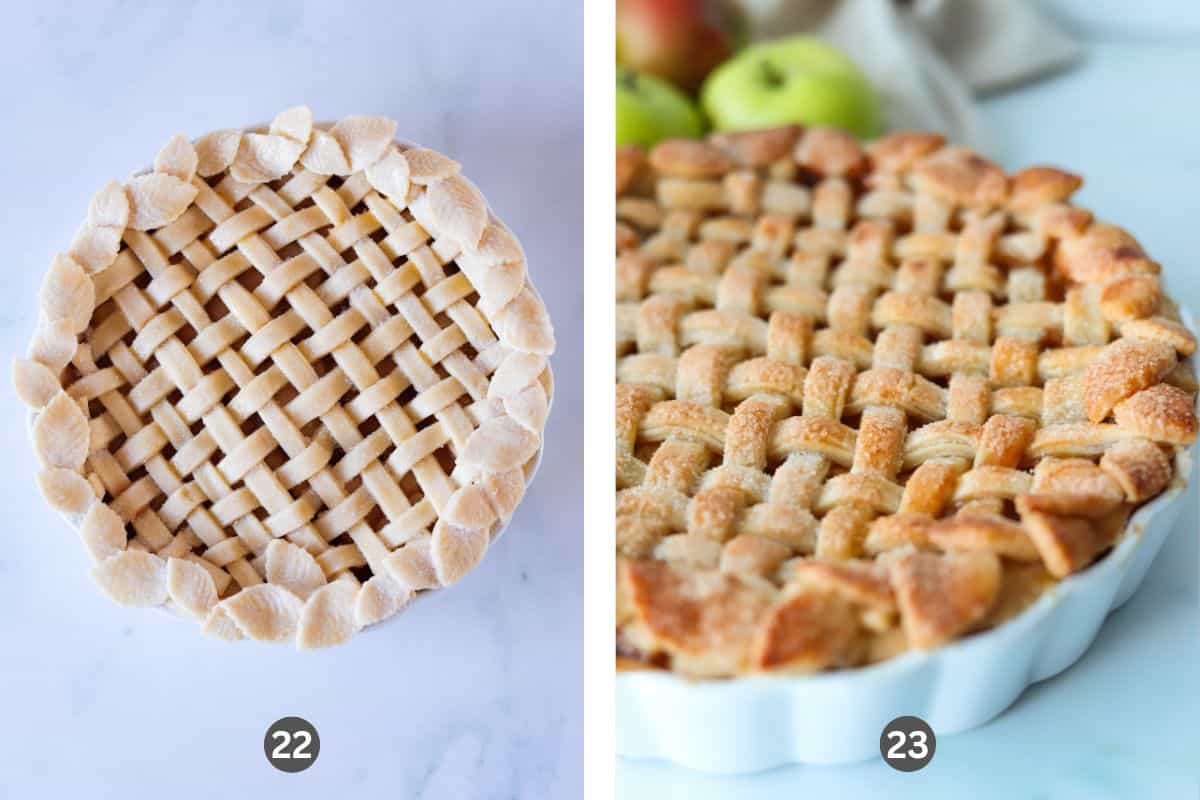
Step 22: Make the egg wash by whisking the egg in a small bowl and using a pastry brush to coat the top of the pie with the egg wash. Sprinkle the pastry with the white sugar.
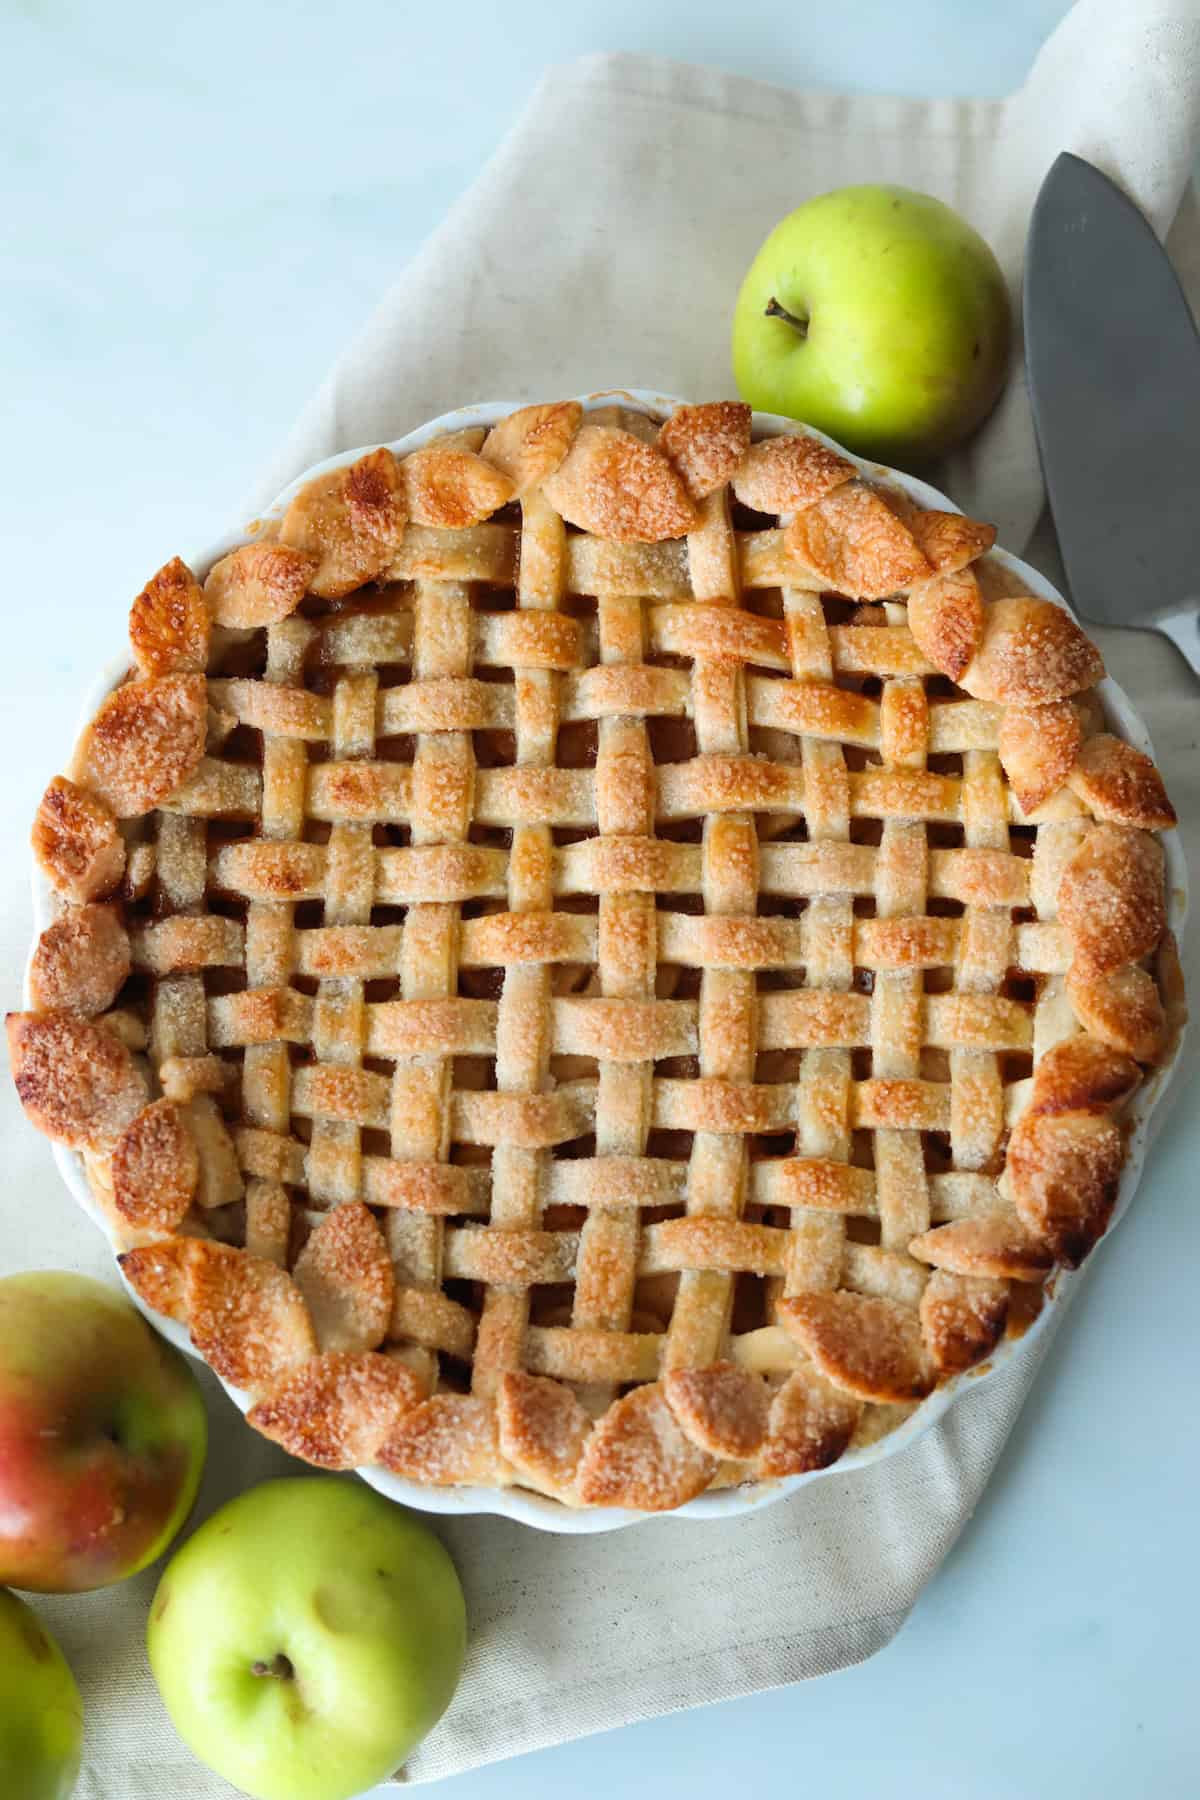
Step 23: Preheat the oven to 220℃/ 425℉.Place the pie dish on the bottom rack and bake for 15 minutes.Reduce the oven temperature to 180℃/350℉ for a further 30-35 minutes until it looks golden brown and the pie filling is bubbling.
Place the pie dish on a cooling rack to cool before serving.
Tip: If the edges of the pie crust are browning too fast, make a tent with foil to cover the edge of the pie while baking to prevent the edges from burning.
💡 Pro Recipe Tips
- Tip #1: Use the best quality ingredients that you can get, as it will make all the difference.
- Tip #2: Work quickly when making the dough as you want to keep the butter cold and not melt.
- Tip #3: I recommend weighing the dough and making one pastry disk bigger than the other. For example, my dough weighs 700g in total, and I divide it up by 400g for the bottom pie crust and 300g for the pie top.
- Tip #4: Chilling the dough after it is placed in the dish will help it firm back up and prevent shrinking during baking.
- Tip #5: Pressing down the apple filling evenly to be sure there are no gaps in the filling.
- Tip #6: If the edges of the pie crust are browning too fast, make a tent with foil to cover the edge of the pie while baking to prevent the edges from burning.
❔ Recipe FAQs
This gluten free apple pie can be stored in an airtight container at room temperature for up to 2 days or in the refrigerator for up to 5 days. The pastry is best the first couple of days after being baked.
Yes, I make the pie the day before I plan to serve it but it can be made a couple of days ahead.
Yes, use your preferred dairy free butter block.
I am obsessed with apple desserts and if you love them too, then you will want to also try my gluten free apple pie bars, gluten free apple cookies, gluten free apple crumble tart, and apple and cinnamon overnight oats.
More gluten free pie recipes


If you tried this gluten free apple pie recipe. Please leave a star 🌟rating in the recipe card below & a review in the comments section further down the page. Subscribe and get free recipes straight to your inbox.
📖 Recipe
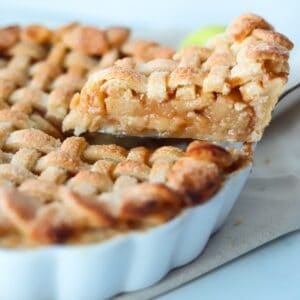
Gluten Free Apple Pie
Nutritional information is meant as a guideline and all information is approximate.
Equipment
- 9 inch pie dish
- Large bowl
- Large pot
Ingredients
Gluten Free Double Pie Crust (You can use pre made store bought pie crust or make my gluten free pie crust recipe)
- 360 grams Gluten free all purpose flour
- 1 tablespoon Sugar
- 1 teaspoon Xanthan gum Use ½ teaspoon if the flour blend already contains xanthan gum.
- ¼ teaspoon Salt
- 250 grams Unsalted butter Cold straight from the fridge.
- 100 ml Cold water
Apple Pie Filling
- 6-7 Apples
- 2 tablespoons Lemon juice
- 100 grams Light brown sugar
- 1 teaspoon Ground cinnamon
- ¼ teaspoon Ground nutmeg
- ¼ teaspoon Salt
- 1 tablespoon Cornstarch
- 60 grams Unsalted butter
- 1 Egg (For egg wash)
- 1 tablespoon White sugar (for dusting pie top)
Instructions
How to make gluten free pie crust
- I have included information on how to make my gluten free pie crust but you can use your preferred recipe. I recommend checking out my full post for my gluten free pie crust recipe as its packed full of tips.
- Add the flour, sugar, and xanthan gum, into a large bowl and mix together. Place the cubed butter into the bowl and coat all the pieces with flour. Using your fingers, press the butter into the flour until the cubes of butter are around large pea-sized, leaving some pieces of butter slightly larger (work quickly as you want to keep the butter cold and not melt during this step). See images in the post above for reference if needed.
- Add the cold water a few tablespoons at a time and mix into the butter and flour mixture. Continue this until the dough comes together well but is not wet and sticky (I used 100 grams of water, if it is too dry slowly adding additional water if needed). Do not knead the dough, as we want to see chunks of butter within the dough. See images in the post above.
- Squeeze the dough together to make a rectangular shape. Wrap in plastic wrap and place the dough in the fridge to rest and chill for around 1 hour.
- Once the pie dough has chilled, it's time to laminate the dough. Roll out the dough onto a lightly floured surface. Brush any excess flour off the top of the dough. Fold the dough into thirds like a letter. Rotate the dough and roll out into a rectangle shape again, and then repeat the letter folds. Repeat this one more time. ( I usually do this 3-4 times in total)
- Roll out the dough until it is around 10 inches long and 1 inch thick. Divide the dough in half and shape it into a disk (My dough weighs 700g in total, and I divide it up by 400g for the bottom pie crust and 300g for the pie top). Wrap each disk well with plastic and place them in the fridge for at least 1 hour, longer if the kitchen is warm.
How to make the apple pie filling
- Peel, core, and slice the apples into thin, even-sized slices and place in a large bowl.
- Mix lemon juice, sugar, cinnamon, nutmeg, salt, and cornstarch into the bowl of sliced apples and set aside.
- In a large pan over a low to medium heat, melt the butter. Add in the sliced apples to the pan, being sure to add any juices that have developed at the bottom of the bowl.
- Stir occasionally for approximately 10 minutes or until the apples have softened. Remove the pan from the heat and set aside while you prepare the pie base.
Constructing the gluten free apple pie
- Roll out the larger pie dough evenly until it is around a 12-inch circle. To make rolling the pie dough easier, I like to roll it out parchment paper or Plastic wrap. (This will prevent it from sticking, and there is no need for extra flour on your surface, which prevents the pastry from drying out. It also makes the dough easier to lift onto the pie dish by lifting up the plastic wrap and then flipping it over the pie dish).
- Carefully transfer the dough without stretching it onto the 9 inch pie dish. Gently press the dough into the bottom and sides of the dish. Trim any excess dough around the edges of the pie dish leaving around 1 inch around the edge of the dish. Fold and tuck the excess dough around the inner edge of the pie dish. This will make a neat, thicker crust around the edge of the pie that is easier to shape.
- Crimp the edge of the crust. The shape of the crimp is your own personal style or preference. I usually like to use my fingers by creating a small v shape around the edges but you can also use a crimping tool or a fork. (This time I wasn't too fussy as I used left over pastry to make a leaf border around the pie rim). Place the pie dish in the fridge for the dough to firm up while you make the pie top.
- I made a lattice pie top by rolling out the other pastry disk and cutting even straight lines to make strips using a pizza cutter and a ruler. You can roll out the disk into a circle and have a full pie lid or make your own creative design.
- Remove the pie dish from the fridge and transfer the cooled apples and juices into the dish, pressing it down evenly to be sure there are no gaps in the filling.
- Carefully place the top pie crust onto the pie dish. and crimp the edges with the bottom pie crust using a crimper or fork to seal the pastry. If making a lattice top, see my images for some guidance on how to do this. I used any leftover pastry dough to make leaves to decorate the edge of the pie. (If making a full pie top be sure to cut some vents in the center of the pie crust to allow steam to be released during baking).
- Make the egg wash by whisking the egg in a small bowl and using a pastry brush to coat the top of the pie with the egg wash. Sprinkle the pastry with the white sugar.
Baking the gluten free apple pie
- Preheat the oven to 220℃/ 425℉. Place the pie dish on the bottom rack and bake for 15 minutes.Reduce the oven temperature to 180℃/350℉ for a further 30-35 minutes until it looks golden brown and the pie filling is bubbling. (If the edges of the pie crust is browning too fast, make a tent with foil to cover the edge of the pie while baking to prevent the edges from burning).
- Place the pie dish on a cooling rack to cool before serving.
Notes
- Tip #1: Use the best quality ingredients that you can get, as it will make all the difference.
- Tip #2: Work quickly when making the dough as you want to keep the butter cold and not melt.
- Tip #3: I recommend weighing the dough and making one pastry disk bigger than the other. For example, my dough weighs 700g in total, and I divide it up by 400g for the bottom pie crust and 300g for the pie top.
- Tip #4: Chilling the dough after it is placed in the dish will help it firm back up and prevent shrinking during baking.
- Tip #5: Pressing down the apple filling evenly to be sure there are no gaps in the filling.
- Tip #6: If the edges of the pie crust are browning too fast, make a tent with foil to cover the edge of the pie while baking to prevent the edges from burning.
Nutrition
Disclaimer
Nutritional information is meant as a guideline and is always an approximate calculation. Recipes may include information of various products used. It is your responsibility to check that ingredients you use when making a recipe are gluten free.


Amanda says
Thank you for visiting. I hope you love the apple pie.